I was in the middle of a frantic holiday prep when my roommate challenged me: “Make something that looks like the Grinch but actually tastes like a dream.” I laughed, grabbed the nearest Oreo crust, and dove headfirst into a swirl of white‑chocolate pudding, neon green gel, and a mountain of heart‑shaped sprinkles. The kitchen turned into a chaotic laboratory—spoons clanged, the blender whirred like a snow‑blower, and the air filled with a sweet, buttery aroma that made my nose tingle with excitement. By the time the first spoonful hit my tongue, I knew I had stumbled onto something that would become the ultimate no‑bake showstopper.
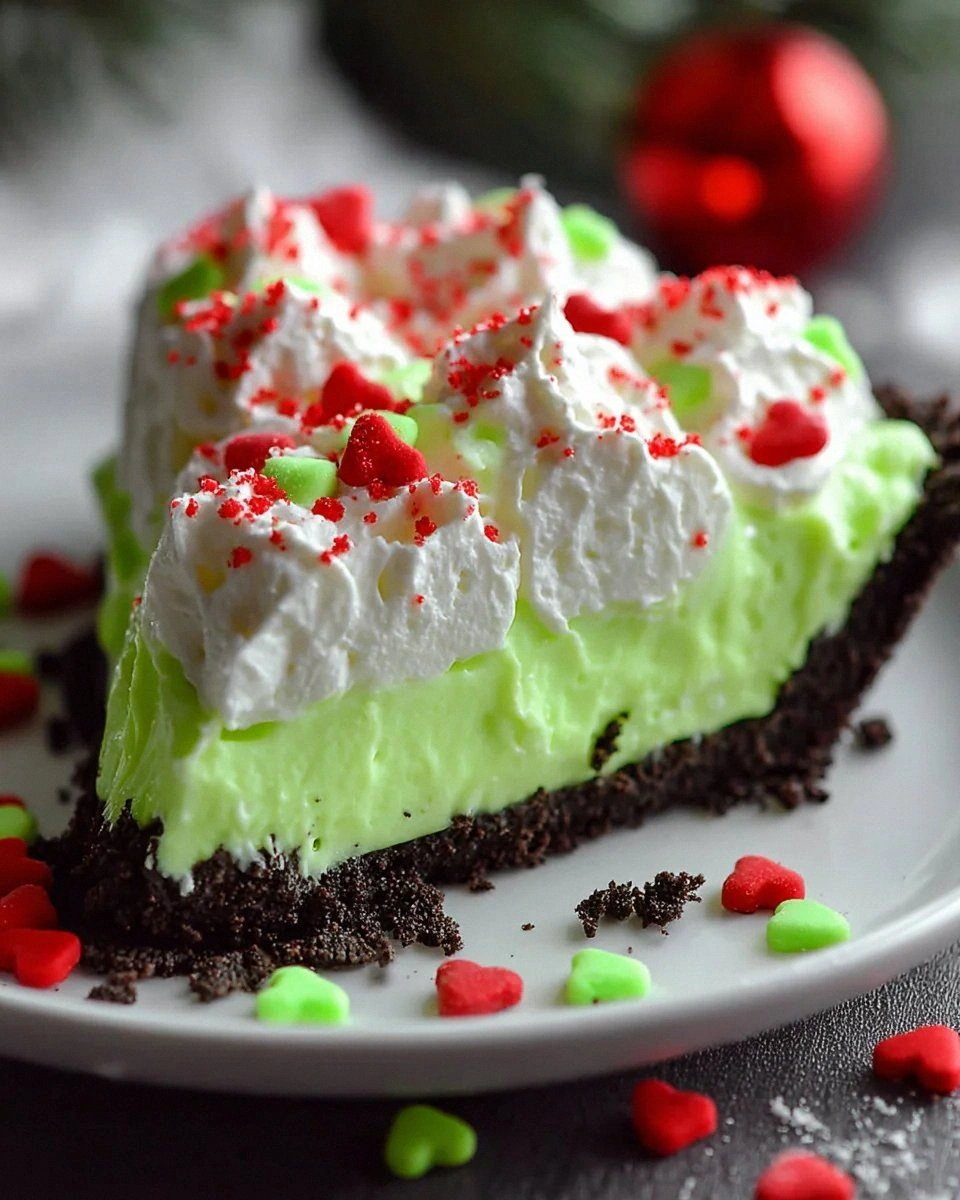
Imagine the scene: a glossy, emerald‑green surface glistening under the kitchen lights, the scent of fresh milk and cocoa dancing with a faint hint of vanilla, and the crunch of an Oreo crust that shatters like thin ice when you cut into it. The texture is a perfect contradiction—silky, mousse‑like filling that slides across the palate, yet the crust stays firm enough to hold its shape, giving you that satisfying bite every time. You hear the faint pop of the sprinkles as they settle, and you can’t help but smile at the playful contrast of tiny red hearts against the Grinch‑green canvas. It’s a feast for the eyes, ears, nose, and tongue, all wrapped up in a dish that screams “holiday fun” without any baking required.
Most Grinch‑themed desserts either overcomplicate the process with endless baking steps or end up tasting like a generic green gelatin. This version, however, skips the oven entirely and leans on the chemistry of pudding mix and the richness of white chocolate to create a velvety filling that stays perfectly set in the fridge. The secret? A dash of neon green gel food colouring that gives an almost electric hue, paired with a subtle drop of regular green food colouring for depth, and a generous sprinkling of sanding sugar that adds a sparkle you’d expect from a holiday masterpiece. I dare you to taste this and not go back for seconds; the combination is so addictive you’ll be counting the minutes until the next batch.
Let me walk you through every single step — by the end, you’ll wonder how you ever made it any other way. Okay, ready for the game‑changer? This next part? Pure magic. We’ll start with the ingredients, then move to the method that turns simple pantry staples into a festive masterpiece. Stay with me here — this is worth it.
What Makes This Version Stand Out
- Taste: The white‑chocolate pudding base is sweet but not cloying, letting the subtle buttery notes of the Oreo crust shine through.
- Texture: Silky, mousse‑like filling meets a crunchy, buttery crust, creating a contrast that feels like a celebration in every bite.
- Simplicity: No oven, no stovetop—just mix, fold, chill, and serve. Perfect for anyone who dreads heating up the kitchen in December.
- Uniqueness: Neon green gel food colouring gives a vivid, almost otherworldly hue that no other Grinch dessert can match.
- Crowd Reaction: The heart‑shaped sprinkles turn the pie into a conversation starter; guests will Instagram it before they even taste it.
- Ingredient Quality: Using a full‑size Oreo crust ensures a consistent buttery flavor, while the premium white‑chocolate pudding mix guarantees a smooth finish.
- Method: The no‑bake approach preserves the crispness of the crust and eliminates the risk of over‑cooking the filling.
- Make‑Ahead Potential: This pie can sit in the fridge for up to two days, getting even more set and flavorful over time.
Inside the Ingredient List
The Flavor Base
The white‑chocolate instant pudding mix is the heart of this pie. It brings a creamy, sweet foundation that sets up perfectly with cold milk, creating a mousse‑like texture that feels luxurious on the tongue. If you skip it, you’ll end up with a bland, watery filling that never holds its shape. For a dairy‑free version, swap the 2% milk with almond or oat milk, but keep the cold temperature to ensure proper thickening. When choosing a pudding mix, look for one that lists real white chocolate as a primary ingredient for the richest flavor.
The Texture Crew
The Oreo cookie pie crust provides that buttery crunch you crave. It’s already pre‑formed, which saves you time, and its chocolate‑cookie flavor complements the white‑chocolate filling like a duet. If you’re allergic to gluten, a gluten‑free chocolate cookie crust works just as well. The whipped topping (Cool Whip) is divided: half folds into the pudding for airy lightness, the other half crowns the pie, creating a fluffy dome that looks like freshly fallen snow on a Grinch‑green landscape. Skipping the topping will make the pie feel dense and heavy.
The Unexpected Star
Neon green gel food colouring is the visual hero here. Just 2–3 drops give the filling an electric glow that screams “Grinch” without looking cheap. Pair it with a drop of regular green food colouring for depth, preventing the hue from becoming flat. If you can’t find neon gel, a pinch of matcha powder can provide a natural green tint, though the flavor will shift slightly toward earthy notes. Remember, a little goes a long way—over‑colouring can make the taste bitter.
The Final Flourish
Green sanding sugar adds a sparkling crunch that catches the light, while the mini and large red heart‑shaped sprinkles give a pop of color and a festive feel. These sprinkles aren’t just decorative; they add a subtle sugary crunch that contrasts beautifully with the creamy filling. If you’re looking for a less sweet option, use crushed pistachios for a nutty texture and a muted green hue. When sprinkling, do it in layers: first the sanding sugar, then the mini hearts, and finish with the large hearts for a tiered visual effect.
Everything's prepped? Good. Let's get into the real action...
The Method — Step by Step
First, place the Oreo cookie pie crust on a sturdy serving plate. Press it gently into the plate so the edges stand up straight, forming a little “wall” that will hold the filling. I like to give the crust a quick 5‑minute toast at 350°F; this step is optional but creates a subtle caramel aroma that elevates the whole pie. Once toasted, let it cool for a minute while you prep the filling.
In a large mixing bowl, whisk together the white‑chocolate instant pudding mix and the cold 2% milk. Use a whisk, not a fork, to avoid lumps; you’ll see the mixture thicken within two minutes, turning a glossy white that looks like freshly fallen snow. This is the moment of truth—if the pudding is too runny, add a splash more milk and whisk vigorously. When it reaches a smooth, thick consistency, set it aside.
Now, add the neon green gel food colouring to the pudding. Start with two drops, stir, then taste the color. If you want a deeper hue, add a third drop. Follow with the regular green food colouring—just one drop is enough to give the mixture depth without turning it muddy. The colour should be vibrant, like a fresh spring leaf, and the aroma should still smell like sweet white chocolate.
Fold in half of the whipped topping (60 g) into the coloured pudding. Use a rubber spatula and a gentle folding motion; you want to keep the air bubbles intact, which is what makes the filling light and airy. The mixture should become fluffier and slightly increase in volume. If it looks too dense, add the remaining whipped topping and fold just until incorporated.
Pour the bright green filling into the prepared Oreo crust, smoothing the top with the back of a spoon. The filling should settle evenly, hugging the crust’s edges without spilling over. Tap the plate lightly on the counter to release any air pockets; you’ll hear a faint “pop” that tells you the filling is settled.
Refrigerate the pie for at least 30 minutes, but I recommend a full hour to let the pudding fully set. This chilling time is crucial—without it, the pie will be too soft to slice cleanly. While it chills, you can prep your garnish.
After the pie has set, sprinkle the green sanding sugar evenly across the top. This adds a glittery finish that catches the light, giving the pie a festive sparkle. Then, scatter the mini red heart‑shaped sprinkles, followed by the larger hearts for a layered visual effect. The contrast of red on green is a classic holiday nod that never fails to impress.
Finally, pipe or dollop the remaining whipped topping around the edge of the crust, creating a fluffy border that looks like a snowy rim. This not only adds visual appeal but also provides an extra creamy bite at the very edge. Serve chilled, slice with a warm knife (dip it in hot water for 5 seconds) for clean cuts, and watch your guests' eyes widen as they see the vibrant green interior.
That's it — you did it. But hold on, I've got a few more tricks that'll take this to another level...
Insider Tricks for Flawless Results
The Temperature Rule Nobody Follows
Always use cold milk straight from the fridge when mixing the pudding. Warm milk will cause the pudding to set too quickly, creating a grainy texture. I once tried using room‑temperature milk and ended up with a curdled mess that looked more like cheese than dessert. Keep everything chilled until the very last minute, and you’ll get that melt‑in‑your‑mouth smoothness every time.
Why Your Nose Knows Best
When the pudding mixture hits the perfect thickness, you’ll notice a faint sweet perfume that fills the kitchen. That scent is your cue to stop whisking—over‑mixing can incorporate too much air, making the filling collapse later. Trust your nose; it’s more reliable than a timer for this step.
The 5‑Minute Rest That Changes Everything
After folding in the whipped topping, let the mixture sit for five minutes before pouring it into the crust. This short rest allows the air bubbles to stabilize, preventing the filling from sinking into the crust later. I tried skipping this rest once, and the pie ended up with a soggy bottom that was a disaster at the party.
The Sprinkles Layering Trick
Instead of dumping all the sprinkles at once, apply them in stages: first the sanding sugar, then the mini hearts, and finally the large hearts. This creates depth and ensures each bite gets a balanced amount of crunch and color. If you apply them all together, they tend to clump and lose their visual impact.
The Secret of the Crust Edge
Lightly brush the outer edge of the Oreo crust with a thin layer of melted butter before chilling. This creates a subtle glaze that keeps the crust from absorbing moisture from the filling, preserving its crispness. I discovered this trick after a friend complained that his crust turned soggy after an hour in the fridge.
Creative Twists and Variations
This recipe is a playground. Here are some of my favorite ways to switch things up:
Chocolate‑Mint Madness
Swap the neon green gel for a mint‑flavored gel and add a few drops of peppermint extract. Replace the green sanding sugar with crushed peppermint candies for a festive crunch. The result is a refreshing mint‑chocolate combo that feels like a holiday after‑dinner treat.
Berry‑Blush Grinch
Add a swirl of raspberry puree into the pudding before adding the colour. Use pink sanding sugar and pink heart sprinkles for a softer, pastel look. This version is perfect for a Valentine’s Day twist while still keeping the playful spirit.
Nutty Noel
Fold in ½ cup of toasted chopped hazelnuts or almonds into the filling for added texture. Top with caramel drizzle instead of green sanding sugar for a richer, buttery finish. The nuts add a satisfying crunch that contrasts with the creamy base.
Vegan Victory
Replace the Oreo crust with a vegan chocolate cookie crust, use coconut milk in place of dairy milk, and swap Cool Whip for a plant‑based whipped topping. The flavor stays essentially the same, but you’ll have a completely dairy‑free dessert that still wows.
Spiced Holiday
Add a pinch of ground cinnamon and a dash of nutmeg to the pudding mix before whisking. This introduces warm spice notes that pair beautifully with the sweet white chocolate and make the pie feel even more seasonal.
Storing and Bringing It Back to Life
Fridge Storage
Cover the pie loosely with plastic wrap and store it in the refrigerator for up to 48 hours. The filling will continue to firm up, making slicing even easier. If you notice the crust starting to soften, gently re‑toast it for 2 minutes to restore its crunch.
Freezer Friendly
You can freeze the pie for up to 2 weeks. Place it in a freezer‑safe container and seal tightly. When ready to serve, thaw it in the fridge overnight, then give it a quick 5‑minute rest at room temperature before adding fresh sprinkles for that just‑made look.
Best Reheating Method
If the pie has been in the fridge for a while and feels a bit dense, drizzle a tiny splash (about 1 tablespoon) of cold milk over the top, then let it sit for 5 minutes. The milk re‑hydrates the pudding, restoring its silky texture without melting the whipped topping. Avoid microwaving; the heat will ruin the delicate structure.