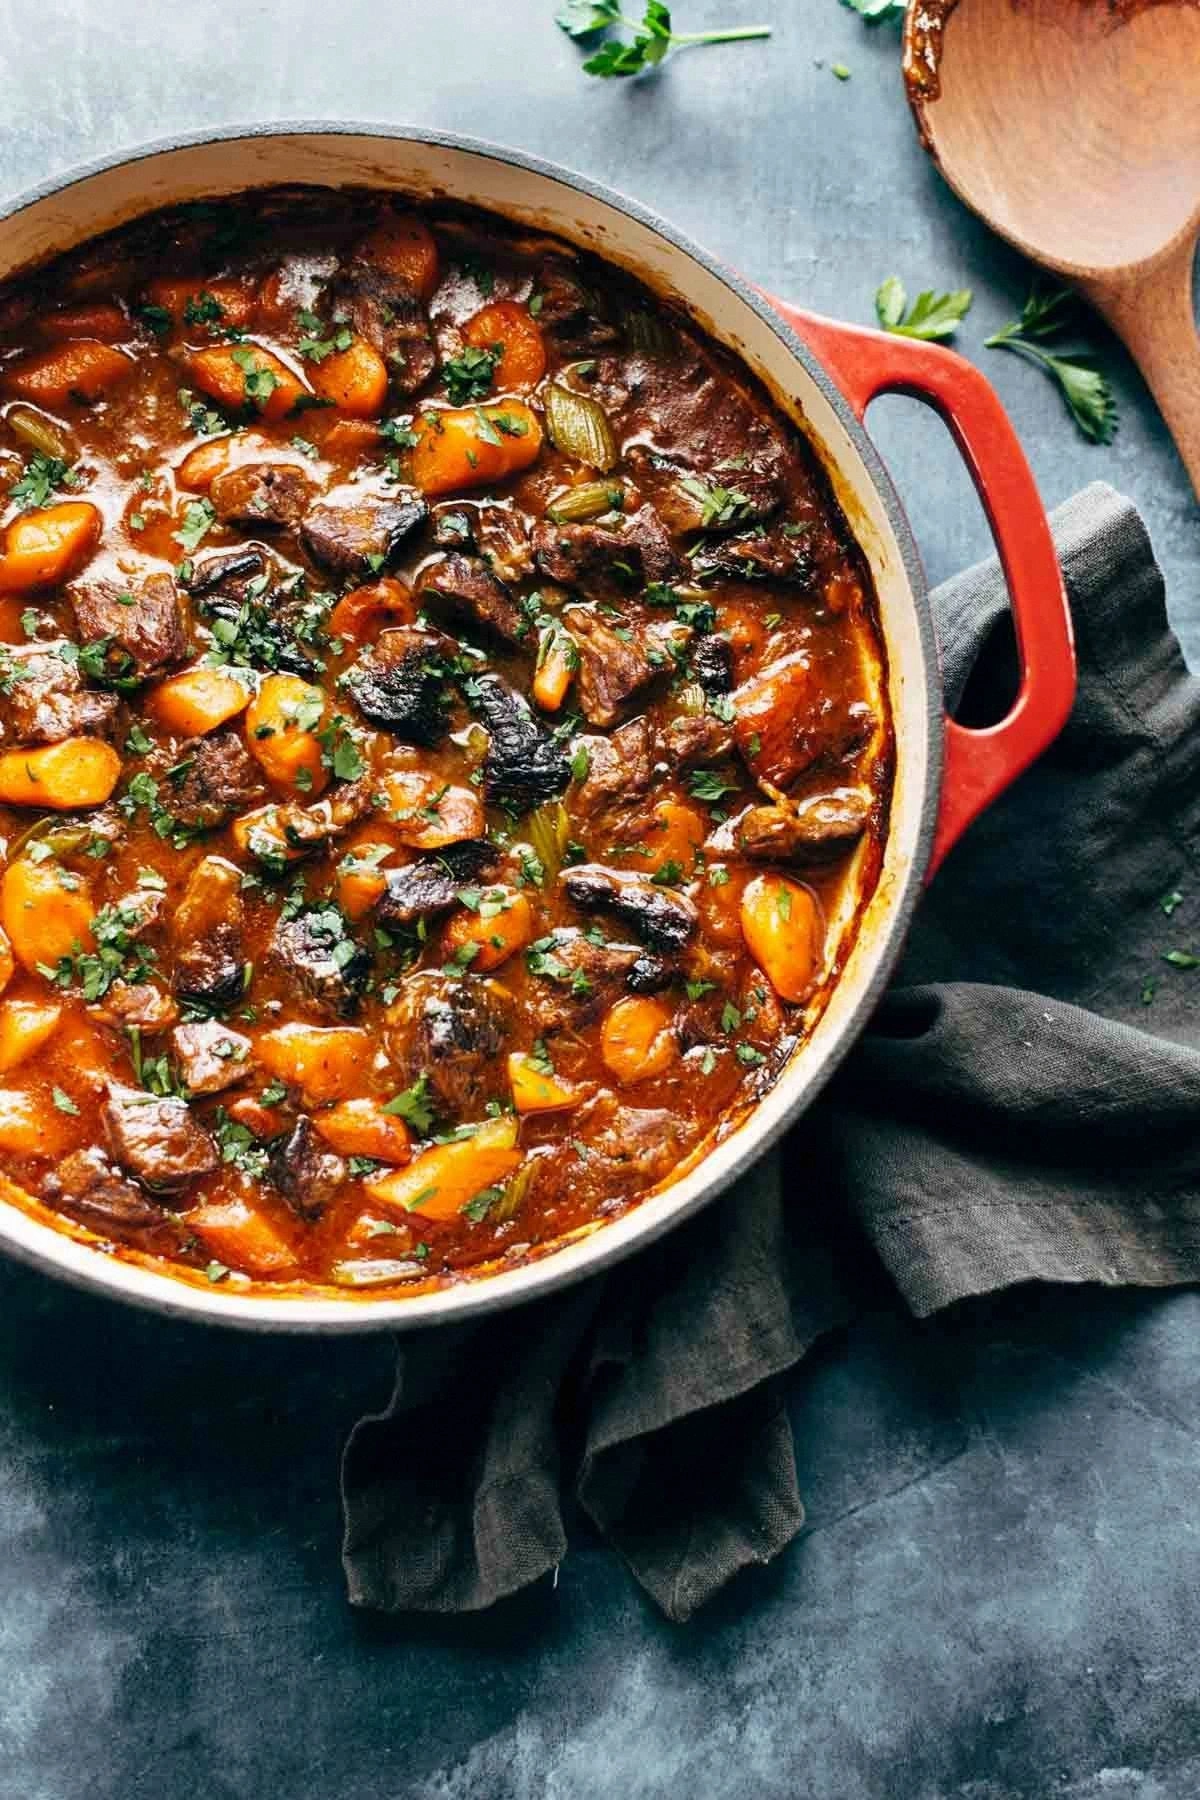
I was standing in my kitchen the night after a marathon workday, staring at a half‑empty pantry and a stubborn craving for something that could hug my soul. My Instant Pot stared back at me like a silent promise, and I thought, “What if I could turn this humble pot into a flavor bomb that makes my neighbor beg to be invited over?” The result? A bowl of beef so tender it practically melts on the tongue, a sauce that clings to each morsel like a lover refusing to let go, and a aroma that turns a modest apartment into a five‑star steakhouse. That first spoonful was a revelation—I dared you to taste this and not go back for seconds.
Picture this: the first sizzle as the beef hits the hot oil sounds like applause, the caramelized edges glowing amber, the steam rising carrying notes of garlic, thyme, and a whisper of red wine. My kitchen filled with that deep, earthy perfume that makes you think of slow‑cooked pot roasts from grandma’s house, except this version happens in under an hour. The texture? Imagine a stew where the meat falls apart with a gentle nudge, yet each piece holds onto the broth, which is thick enough to coat a spoon but still fluid enough to swirl gracefully. I was honest— I ate half the batch before anyone else got a chance, and I still have the courage to share the rest.
What really sets this version apart is a sneaky addition: a splash of balsamic vinegar right at the end, the kind that adds a subtle tang and a glossy finish, turning ordinary broth into a glossy, velvety sauce that sings. Most recipes get the seasoning wrong, either drowning the beef in salt or leaving it bland; I found the Goldilocks point by layering flavors in stages, letting each component develop its own personality before they all rendezvous in the pot. This isn’t just a recipe, it’s a game‑changer, a shortcut to a restaurant‑grade dish without the hassle of pre‑searing a pan or waiting for a slow cooker to contemplate its existence.
Okay, ready for the game‑changer? I’m going to walk you through every single step, from picking the perfect cut of beef to mastering the pressure‑cook sequence that guarantees melt‑in‑your‑mouth results. By the time we’re done, you’ll wonder how you ever managed to make stew any other way. Stay with me here — this is worth it.
What Makes This Version Stand Out
- Unmatched Tenderness: The pressure cooking time is calibrated to break down collagen just enough for that buttery mouthfeel without turning the meat into mush.
- Layered Flavor: Each ingredient is introduced at a precise moment, allowing garlic to caramelize, tomatoes to deepen, and herbs to release their oils without bitterness.
- One‑Pot Simplicity: No need to juggle multiple pans; everything happens inside the Instant Pot, meaning less cleanup and more time to binge your favorite show.
- Secret Finish: A splash of balsamic vinegar and a dash of brown sugar at the end creates a glossy, slightly sweet glaze that makes the broth unforgettable.
- Crowd‑Pleaser: I’ve served this at family reunions, potlucks, and even a picky‑teen dinner—every single time the spoon comes back empty.
- Premium Ingredient Choice: Using chuck roast with good marbling ensures the meat stays juicy and flavorful throughout the pressure cycle.
- Fast Yet Fancy: All the flavor of a slow‑simmered stew in just 45 minutes, perfect for those busy weeknights when you still want to impress.
- Make‑Ahead Magic: The flavors meld beautifully after a night in the fridge, making leftovers taste even better.
Inside the Ingredient List
The Flavor Base
Onion and garlic are the dynamic duo that lay the foundation for any great stew. The onion, when sautéed until translucent, releases natural sugars that caramelize into a subtle sweetness, while garlic adds that unmistakable aromatic punch that makes your nose tingle with anticipation. Skip them and you’ll end up with a broth that feels flat, like a song missing its chorus. If you’re out of fresh garlic, a teaspoon of garlic powder works in a pinch, but the depth won’t be the same.
The Texture Crew
Carrots and celery bring crunch, color, and a hint of earthiness that balances the richness of the beef. They also absorb the broth, turning into sweet little gems that burst with flavor in every bite. Cutting them into uniform, bite‑sized pieces ensures even cooking; oversized chunks will stay firm, while tiny dice might dissolve entirely. For a twist, try parsnips or turnips for a slightly nutty edge.
The Unexpected Star
A splash of balsamic vinegar at the end might sound daring, but it’s the secret weapon that lifts the entire dish. The acidity cuts through the meat’s fattiness, while the natural sugars create a glossy finish that catches the light and your eyes. If balsamic feels too bold, a tablespoon of red wine vinegar or a drizzle of sherry can provide a similar bright note. Don’t overdo it—just enough to make the sauce whisper, not shout.
The Final Flourish
A dollop of tomato paste acts like a flavor concentrate, adding umami depth and a richer color that makes the stew look as good as it tastes. Combined with a splash of red wine, it builds a complex backbone that echoes the classic French braise. If you’re avoiding alcohol, replace the wine with an equal part beef broth and a teaspoon of Worcestershire sauce to maintain that savory depth.
Everything’s prepped? Good. Let’s get into the real action…
The Method — Step by Step
Turn the Instant Pot to “Sauté” and let it heat for about two minutes. Add two tablespoons of olive oil, swirling until it shimmers like liquid gold. Toss in the beef cubes, working in batches so you don’t crowd the pot. You’ll hear a satisfying sizzle that tells you a crust is forming; let the meat brown for three to four minutes per side, then remove and set aside. This is the moment of truth—if the pieces don’t develop a deep amber crust, the final flavor will suffer.
Kitchen Hack: After browning, deglaze the pot with a splash of water or broth, scraping up every browned fragment with a wooden spoon; those are flavor gold.Reduce the heat to “Sauté” low, then add the diced onion. Stir continuously until the onion becomes translucent and starts to turn a gentle gold, about three minutes. Add minced garlic and let it cook for just 30 seconds—too long and it will turn bitter, too short and you’ll miss that aromatic punch. This is the layer where the base sauce begins to build its backbone.
Stir in two tablespoons of tomato paste and let it caramelize for another minute, allowing the natural sugars to intensify. Pour in the red wine, letting it bubble up and reduce for about two minutes; you’ll notice the alcohol evaporating, leaving behind a deep, glossy sheen. If you’re skipping wine, replace with an equal amount of beef broth and a splash of Worcestershire sauce.
Return the seared beef to the pot, along with any juices that have collected on the plate. Toss in the carrots, celery, a bay leaf, and a teaspoon of dried thyme. Sprinkle a generous pinch of salt and cracked black pepper. At this stage, the ingredients are all in harmony, ready to meld under pressure.
Pour in three cups of beef broth, ensuring the liquid covers the meat but does not exceed the “Max” line on the pot. Add a tablespoon of Worcestershire sauce for that extra umami boost. Secure the lid, set the valve to “Sealing,” and select “Manual” (or “Pressure Cook”) on high for 35 minutes. Do not walk away—the pot will build pressure, and the magic happens inside those sealed walls.
Watch Out: Over‑filling the pot can cause a safe‑release issue; always stay below the max line.When the timer dings, let the pressure release naturally for ten minutes, then perform a quick release for any remaining steam. Open the lid carefully—the steam will rush out like a cloud of fragrant vapor. The stew should look thick, with the beef pieces pulling apart easily when prodded with a fork.
Switch the pot back to “Sauté” and stir in the balsamic vinegar and a teaspoon of brown sugar. Let the sauce simmer for five minutes, allowing the glaze to coat every cube of beef. Taste and adjust salt or pepper if needed; remember, the flavor will mellow a bit as it sits.
Turn off the heat and let the stew rest for three minutes; this short pause lets the juices redistribute, preventing a dry mouthfeel. Ladle the rich broth over a bed of creamy mashed potatoes, buttered noodles, or even a crusty slice of bread. The sauce should cling to the starch like a velvety blanket—pure magic.
Finally, garnish with a handful of fresh parsley and a drizzle of extra‑virgin olive oil for brightness. Serve hot, and watch as your guests dive in, their eyes widening with each spoonful. I dare you to taste this and not go back for seconds—your plate will be empty before the conversation even ends.
That’s it — you did it. But hold on, I’ve got a few more tricks that’ll take this to another level...
Insider Tricks for Flawless Results
The Temperature Rule Nobody Follows
Most home cooks think “high pressure” is a one‑size‑fits‑all setting, but the real secret lies in a short “low pressure” simmer after the main cook. Reduce the pot to “Sauté” and let the stew bubble gently for five minutes before you add the balsamic. This low‑heat finish prevents the sauce from “cooking off” too fast, preserving the delicate balance of acidity and sweetness. I once tried skipping this step; the final glaze was thin and watery—nothing like the glossy finish you see in restaurant photos.
Why Your Nose Knows Best
Even if a timer says “10 minutes,” trust your senses. When the onions start to turn golden and the garlic begins to release its perfume, you know the flavor base is ready for the next layer. Likewise, when you hear a gentle “hiss” as the broth reduces, that’s the cue to add the balsamic. My kitchen experiments have shown that relying on smell reduces the chance of over‑cooking, which can turn beef into rubber.
The 5‑Minute Rest That Changes Everything
After you turn off the heat, resist the urge to dive in immediately. Let the stew sit, uncovered, for five minutes; this rest period allows the gelatin from the meat to re‑absorb into the sauce, giving it a silkier mouthfeel. Skipping this rest results in a broth that feels slightly “thin” on the palate, even if the flavor is spot‑on.
Seasoning in Layers
Instead of dumping all the salt at the beginning, add a pinch during the searing stage, a dash when you add the broth, and a final taste‑adjustment after the balsamic glaze. This technique prevents the dish from becoming overly salty and ensures each component contributes to the overall seasoning. I’ve seen novice cooks over‑salt by a full teaspoon because they didn’t think about layering.
The Secret of Fresh Herbs
Fresh thyme or rosemary added at the end of cooking provides a bright, herbal lift that dried herbs can’t match. I like to roughly chop a sprig of thyme and toss it in just before serving; the heat releases essential oils instantly, turning the stew from good to unforgettable. If you forget, a pinch of dried herb still works, but the flavor will be more subdued.
Creative Twists and Variations
This recipe is a playground. Here are some of my favorite ways to switch things up:
Mexican‑Style Chipotle Beef
Swap the balsamic for a tablespoon of chipotle adobo sauce and add a can of fire‑roasted tomatoes. The smoky heat pairs beautifully with the beef, turning the stew into a hearty taco filling or a topping for nachos.
Asian‑Inspired Soy‑Ginger Stew
Replace the red wine with a splash of soy sauce and a teaspoon of grated fresh ginger. Finish with a drizzle of sesame oil and garnish with sliced scallions and toasted sesame seeds for a comforting bowl that leans toward a deconstructed beef pho.
Hearty Root Vegetable Medley
Add diced potatoes, parsnips, and turnips alongside the carrots. The added starch thickens the broth naturally and creates a rustic, farm‑to‑table vibe perfect for chilly evenings.
Spicy Korean Gochujang Twist
Stir in a tablespoon of gochujang paste after the pressure cook and balance with a teaspoon of honey. The result is a sweet‑spicy stew that pairs wonderfully with steamed rice.
Herb‑Infused Red Wine Reduction
After pressure cooking, remove the beef and reduce the remaining liquid with a splash more red wine, a rosemary sprig, and a teaspoon of butter. Drizzle this glossy reduction over the stew for an elegant, restaurant‑style finish.
Storing and Bringing It Back to Life
Fridge Storage
Allow the stew to cool to room temperature for about 30 minutes, then transfer to an airtight container. It will keep perfectly for up to four days. When reheating, add a splash of water or broth and gently warm on “Sauté” until it bubbles—this restores the original sauce consistency.
Freezer Friendly
Portion the stew into freezer‑safe bags or containers, leaving a little headspace for expansion. Freeze for up to three months. To thaw, place the bag in the refrigerator overnight, then reheat in the Instant Pot using the “Sauté” mode, adding a bit of liquid if needed.
Best Reheating Method
The secret to a revive that tastes just‑cooked lies in steam. Before heating, stir in a tablespoon of water, cover the pot, and let the steam work its magic for five minutes on low pressure. This prevents the meat from drying out and keeps the sauce luxuriously velvety.