I was standing in my tiny apartment kitchen, staring at a half‑cooked packet of instant noodles, when my roommate burst in with a grin and a frozen box of lobster tails. “Bet you can’t turn this into something that’ll make the whole building jealous,” she said, slamming the freezer door with a theatrical flourish. I laughed, I dared, and I dove straight into the deep end of seafood decadence. The result? A garlic‑butter lobster and scallop masterpiece that turned my modest kitchen into a five‑star seaside bistro in less than an hour.
Picture this: the buttery aroma of garlic sizzling in a hot pan, the faint hiss of caramelizing scallops, and the subtle zing of lemon cutting through the richness like a cool ocean breeze. The sound of the butter bubbling is like a tiny fireworks show, each pop promising a burst of flavor that will coat the lobster meat in silk‑smooth luxury. You can feel the heat radiating from the skillet, the gentle tremor of anticipation as the sauce thickens, and the glossy sheen that signals it’s ready for the final flourish. My senses were on overload, and I knew I was about to create something unforgettable.
Most recipes I’ve tried either drown the lobster in a greasy swamp or leave the scallops undercooked, rubbery, and sad. This version, however, treats each piece of seafood like royalty, using a precise butter‑garlic emulsion that clings like velvet and a quick sear that gives the scallops a caramelized crust that shatters like thin ice when you bite into it. I’m not exaggerating when I say this is hands down the best version you’ll ever make at home – and I’m willing to stake my favorite skillet on it. I’ll be honest — I ate half the batch before anyone else got to try it, and I still have a bite left for you.
The secret? A splash of lemon juice added at the very end, and a pinch of fresh parsley that does more than just garnish – it lifts the whole dish into a bright, balanced crescendo. I dare you to taste this and not go back for seconds. Let me walk you through every single step — by the end, you’ll wonder how you ever made it any other way.
What Makes This Version Stand Out
- Flavor Explosion: The garlic‑butter sauce is infused with a precise ratio of butter to garlic that creates a buttery pool that clings to every curve of the lobster tail, while the lemon adds a bright counterpoint that prevents the richness from becoming cloying.
- Texture Symphony: Lobster meat stays buttery and tender, whereas the scallops develop a caramelized crust that cracks like a delicate shell, offering a satisfying contrast in every bite.
- Simplicity Meets Luxury: You only need six ingredients, but the technique elevates them to a restaurant‑level experience without a mountain of prep work.
- Ingredient Quality: Fresh or properly thawed lobster tails and sea scallops are the stars; the rest of the cast simply amplifies their natural brilliance.
- Crowd Reaction: I’ve served this at dinner parties and watched guests stare at the plate, then immediately reach for seconds – a true show‑stopper.
- Cooking Method: A quick sear followed by a gentle finish in the butter sauce ensures the seafood is perfectly cooked, never over‑done.
- Make‑Ahead Potential: The sauce can be prepared ahead of time, and the seafood can be finished just minutes before serving, making it ideal for entertaining.
- Versatility: The same base can be transformed into a pasta topping, a risotto stir‑in, or even a luxurious taco filling with a few simple tweaks.
Alright, let's break down exactly what goes into this masterpiece...
Inside the Ingredient List
The Flavor Base
Butter: Unsalted butter is the liquid gold that carries the garlic, lemon, and parsley into every nook of the lobster meat. It creates a glossy, velvety sauce that feels like a warm hug for your palate. If you skip it, you’ll end up with a dry, under‑seasoned dish that feels like a missed opportunity. For a richer mouthfeel, you can substitute half the butter with a splash of heavy cream, but be careful not to dilute the garlic punch.
Garlic: Fresh minced garlic releases allicin, the compound that gives that unmistakable aromatic punch. When sautéed gently, it mellows into a sweet, nutty flavor that doesn’t overpower the delicate seafood. Using pre‑minced jarred garlic will work in a pinch, but you’ll lose the nuanced depth that fresh cloves provide. A pro tip: crush the cloves first, then mince – this releases more oils and maximizes flavor.
The Texture Crew
Lobster Tails: Fresh lobster tails are sweet, firm, and slightly buttery on their own. If you’re using frozen, thaw them slowly in the refrigerator overnight to prevent waterlogging, which can make the meat mushy. Cutting a shallow “X” on the top shell helps the butter seep in, ensuring every bite is infused with flavor. If you can’t find tails, large claw meat works as a substitute, though the texture will be a bit firmer.
Sea Scallops: Plump scallops have a delicate sweetness that pairs perfectly with garlic butter. Pat them dry – moisture is the enemy of a good sear, and a dry surface will caramelize beautifully. If you buy pre‑seared “dry‑aged” scallops, you’ll miss the satisfying crust that makes this dish iconic. Look for scallops that are at least 1‑inch thick; they’ll stay tender inside while forming that golden crust.
The Unexpected Star
Parsley: Fresh parsley isn’t just a garnish; its bright, herbaceous notes cut through the richness of butter and bring a garden‑fresh finish. If you substitute with dried parsley, the flavor will be muted and the color will look dull. For extra depth, try a mix of flat‑leaf parsley and a pinch of fresh thyme – the thyme adds an earthy whisper that complements the sea‑sweetness.
The Final Flourish
Lemon Juice: A splash of lemon juice at the end adds acidity that lifts the whole dish, preventing the butter from feeling heavy. It also brightens the natural sweetness of the lobster and scallops, making each bite feel like a wave of sunshine. If you’re wary of the acidity, start with a teaspoon and taste; you can always add more. For a subtle twist, try a drizzle of Meyer lemon juice for a sweeter citrus profile.
Everything's prepped? Good. Let's get into the real action...
The Method — Step by Step
Start by thawing your lobster tails if they’re frozen. Place them in a sealed bag and submerge in cold water for about 15‑20 minutes; you’ll hear the shells start to soften, a sign they’re ready. While they’re warming, pat the scallops dry with paper towels – this is the moment where you decide whether you want a perfect sear or a soggy disappointment. Tip: A dry surface will give you that caramelized crust that makes the scallops sing.
Kitchen Hack: Sprinkle a tiny pinch of kosher salt on the scallops while they sit for five minutes; the salt draws out excess moisture, ensuring a drier surface for searing.Heat a large skillet over medium‑high heat and add two tablespoons of butter. Once the butter foams and starts to turn a light golden color – that’s the scent of anticipation, the moment when the kitchen feels alive – toss in the minced garlic. Let the garlic sizzle for about 30 seconds; you’ll hear a gentle pop that tells you the flavor is blooming without burning.
Now, gently lay the lobster tails meat‑side down into the pan. You should hear a satisfying sizzle that echoes like a tiny fireworks display. Cook for 2‑3 minutes, allowing the butter to seep into the flesh, then flip and baste with the garlicky butter using a spoon. Watch Out: If the butter starts to brown too quickly, lower the heat – burnt butter will turn the whole dish bitter.
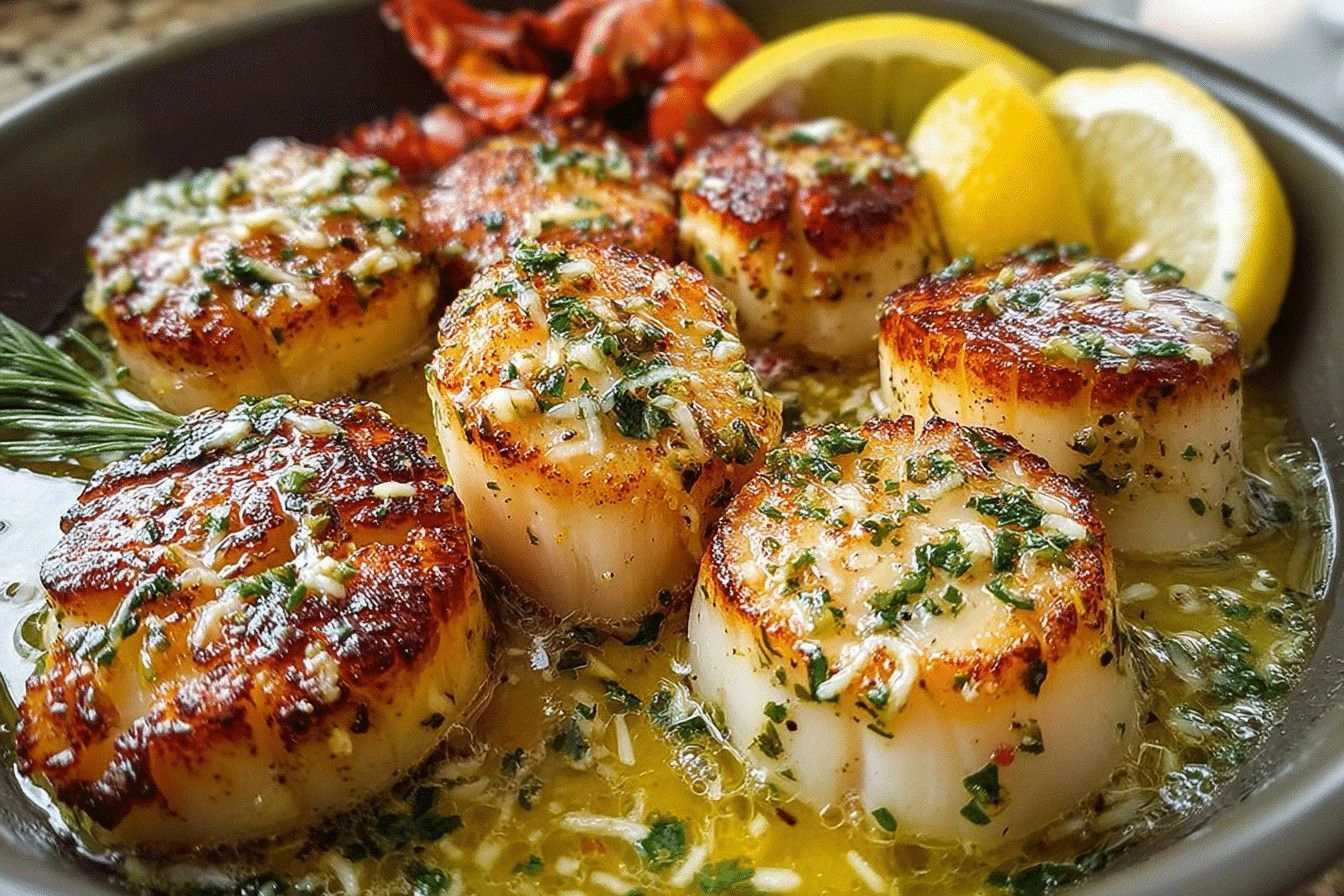
Watch Out: Over‑cooking lobster makes it rubbery; you’ll know it’s done when the meat is opaque and just starts to curl at the edges.While the lobster is finishing, push it to one side of the pan and add the remaining four tablespoons of butter. Let it melt, then increase the heat slightly to create a light foam. Toss the scallops in a single layer; they should immediately hit the pan with a confident sizzle. Cook for 1‑2 minutes per side, resisting the urge to move them – the crust will form and the edges will start pulling away, a visual cue that they’re ready.
When the scallops are golden brown, drizzle the lemon juice over the entire pan. The acid will hiss and deglaze the pan, lifting all the caramelized bits and mixing them into the sauce. Sprinkle the chopped parsley over everything, and give the pan a quick toss to coat each piece in the glossy, herb‑infused butter.
Now comes the moment of truth: taste a tiny piece of lobster and a scallop. The sauce should be silky, the garlic fragrant but not harsh, and the lemon bright enough to cut through the butter without stealing the spotlight. If it feels a touch heavy, add a splash more lemon juice – I dare you to balance it perfectly.
Transfer the seafood to a warmed serving platter, spoon the remaining butter sauce over the top, and let the steam rise like a fragrant veil. This is the part where you stare at the plate and think, “Did I just create a masterpiece or a miracle?” Trust me, it’s both.
Serve immediately with crusty bread or a light salad. The bread is perfect for mopping up every last drop of sauce, and the salad adds a crisp contrast that keeps the palate from feeling overwhelmed. Picture yourself pulling this out of the oven, the whole kitchen smelling incredible, and your guests reaching for seconds before the first bite is even swallowed.
That's it — you did it. But hold on, I've got a few more tricks that'll take this to another level...
Insider Tricks for Flawless Results
The Temperature Rule Nobody Follows
Never start with a scorching hot pan; the butter will burn before the seafood even touches it. Instead, preheat the skillet over medium and add the butter, letting it melt slowly until it just begins to foam. This controlled heat ensures the butter emulsifies with the garlic, creating a sauce that stays glossy instead of turning grainy. I once tried a “high‑heat” shortcut and ended up with a bitter, burnt flavor that no amount of lemon could rescue.
Why Your Nose Knows Best
Your sense of smell is a more reliable indicator than a timer when searing scallops. When the edges start to turn golden and you catch that nutty, slightly caramel scent, you know the crust is forming. If you’re still unsure, lift one scallop and check the color – it should be a deep amber, not a pale tan. Trusting your nose prevents over‑cooking and guarantees that satisfying “crack‑like” texture.
The 5‑Minute Rest That Changes Everything
After you pull the lobster and scallops from the pan, let them rest for five minutes under a loose foil tent. This short rest allows the juices to redistribute, ensuring each bite is juicy rather than dry. It also gives the butter sauce a chance to thicken slightly, coating the seafood like a silk sheet. Skipping this step is a common rookie mistake that leads to a soggy plate.
Seasoning Layers, Not Just One
Season the lobster with a pinch of sea salt before cooking; the salt helps draw out moisture, which in turn creates a better sear. Then, season the scallops lightly right before they hit the pan. Finally, finish with a dash of flaky sea salt just before serving to add a delicate crunch. This three‑stage seasoning builds flavor depth without overwhelming the delicate seafood.
Butter Basting Magic
Creative Twists and Variations
This recipe is a playground. Here are some of my favorite ways to switch things up:
Spicy Chili‑Garlic Fusion
Add a teaspoon of crushed red pepper flakes to the garlic butter for a subtle heat that awakens the palate. The spice pairs beautifully with the sweet lobster and scallops, turning the dish into a bold, adventurous bite that’s perfect for winter evenings.
Herb‑Infused Delight
Swap parsley for a mixture of fresh dill and tarragon. Dill adds a bright, almost citrusy note, while tarragon contributes a hint of anise that complements the sea‑sweetness. This variation feels like a coastal garden on a plate.
Coconut‑Lime Luxury
Replace half the butter with coconut oil and finish with fresh lime zest instead of lemon. The coconut adds a tropical creaminess, and the lime brings a sharper zing, turning the dish into a tropical getaway for your taste buds.
Pasta Partner
Toss the finished lobster and scallops with al dente linguine, letting the butter sauce cling to every strand. Add a handful of toasted pine nuts for crunch, and you have a luxurious seafood pasta that feels like a date‑night centerpiece.
Savory Skillet Toast
Lay thin slices of baguette in the pan after the seafood is done, letting them soak up the remaining butter sauce. Serve the toast alongside the lobster and scallops for a crunchy, buttery side that turns the plate into a full‑on indulgent feast.
Storing and Bringing It Back to Life
Fridge Storage
Allow the dish to cool to room temperature, then transfer the seafood and sauce into an airtight container. Store in the refrigerator for up to two days. When reheating, place the container in a skillet over low heat, adding a splash of water or extra butter to revive the sauce’s silkiness.
Freezer Friendly
If you need to keep it longer, separate the lobster tails and scallops from the butter sauce. Freeze the seafood on a parchment‑lined tray, then transfer to a zip‑top bag for up to three months. Freeze the sauce in a small freezer‑safe jar. To serve, thaw both components in the refrigerator overnight, then gently reheat together in a skillet.
Best Reheating Method
The secret to reheating without drying out is a gentle steam‑bath. Add a teaspoon of water or broth to the pan, cover, and heat over low for three to five minutes. The steam will revive the butter sauce, and the seafood will stay tender. Avoid microwaving – the high heat will toughen the lobster and turn the scallops rubbery.