Picture this: I’m standing in my cramped kitchen, the clock ticking, a stack of take‑out containers looming like a small army, and my taste buds screaming for a home‑cooked triumph. I had just burnt a batch of garlic bread that tasted like cardboard, and my friends were already laughing about my culinary blunders. That night, I decided I’d had enough of the same old chicken recipes that turned into poultry puns and my pantry was a sad, empty desert. The result? A dish that feels like a hug from a gourmet chef, but you can make it in 30 minutes without a culinary degree.
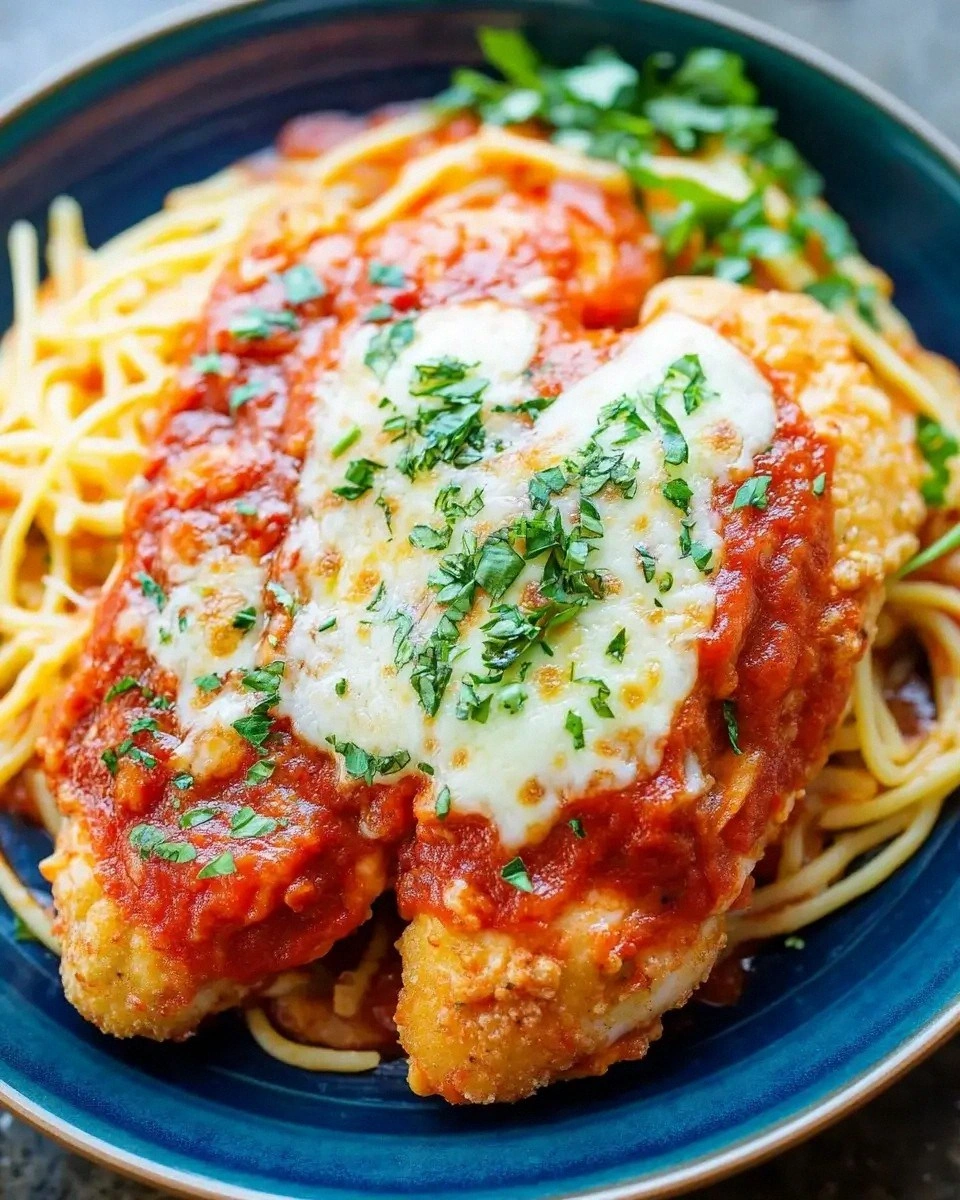
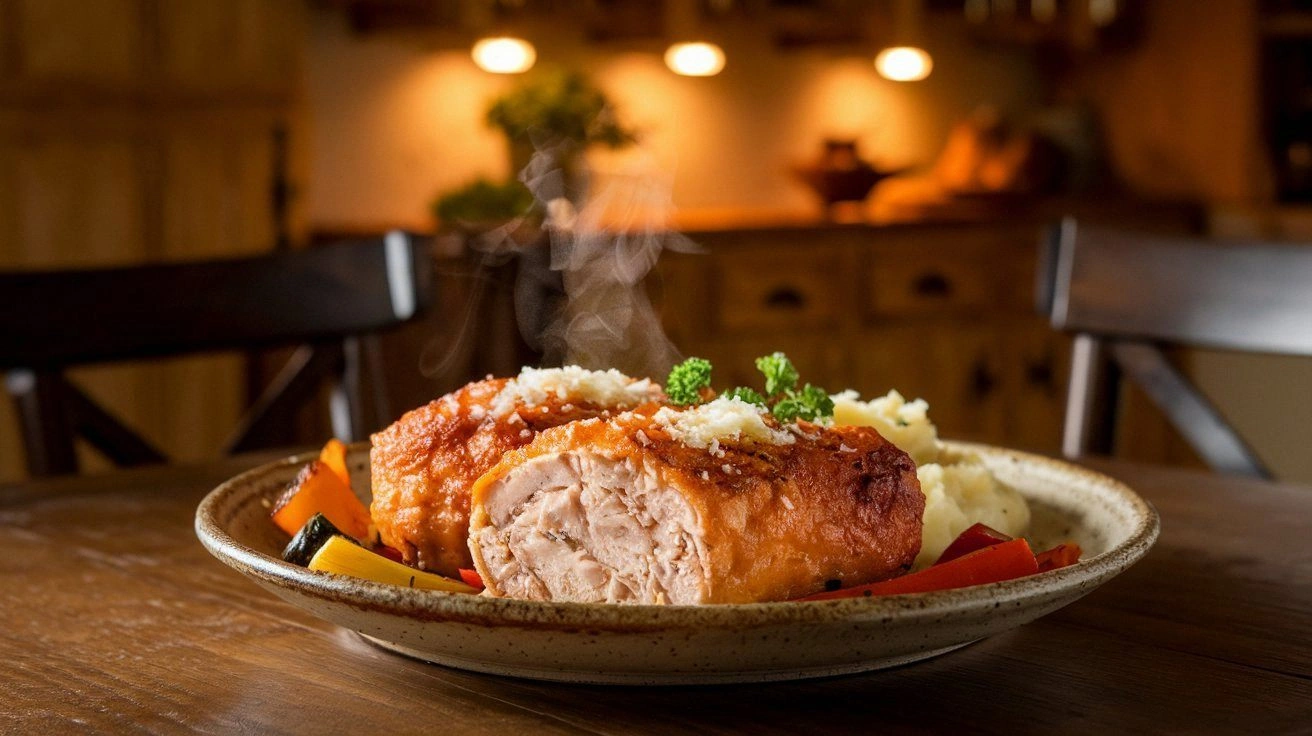
The first thing you notice is the aroma: warm, buttery, and unmistakably garlicky, like a campfire with a side of parmesan. As you slice the chicken, the tender flesh glistens, and a faint scent of herbs wafts through the air. The sound of the pan sizzling when the butter meets the garlic is music to any cook’s ears. When you take that first bite, the chicken is juicy, the garlic is mellow, and the parmesan forms a crispy, golden crust that crackles like a small, edible fireworks display. The texture is a perfect balance of tender meat and a crunchy, cheesy shell that satisfies every craving.
What sets this version apart from the countless “garlic parmesan chicken” recipes you find online is the simplicity of the technique coupled with a secret ingredient that elevates the flavor profile from ordinary to unforgettable. I dared you to taste this and not go back for seconds, and I guarantee you won’t. The recipe’s brilliance lies in how it turns a basic protein into a showstopper, making it the best version you’ll ever make at home. It’s not just about the taste; it’s about the confidence you feel when you pull that golden masterpiece out of the oven, the whole kitchen smelling incredible, and everyone asking for the recipe.
Let me walk you through every single step — by the end, you’ll wonder how you ever made it any other way. The method is straightforward, the ingredients are pantry staples, and the result is a dish that will impress even the most skeptical food critics in your living room. I’ll share the trick that keeps the chicken moist, the hack that saves you time, and the tweak that turns this into a crowd‑pleasing entrée. Ready? Let’s dive in.
What Makes This Version Stand Out
This isn’t just another chicken recipe; it’s a masterclass in flavor engineering, and here’s why:
- Flavor Fusion: The combination of garlic, parmesan, and a hint of lemon zest creates a savory-sweet profile that’s both comforting and sophisticated.
- Texture Triumph: The breadcrumb and cheese crust provides a satisfying crunch that contrasts with the juicy interior.
- Time Efficiency: In just 30 minutes, you have a full dinner ready, making it perfect for busy weeknights.
- Ingredient Accessibility: Every component can be found in a typical grocery store, no exotic spices required.
- Versatility: This base can be transformed into a casserole, a pizza topping, or even a stuffed chicken breast.
- Crowd‑Pleaser: Even the pickiest eaters love the buttery, garlicky crust and the melt‑in‑your‑mouth chicken.
- Make‑Ahead Potential: The dish can be assembled ahead of time and baked fresh when needed.
- Health‑Friendly: With lean protein and moderate carbs, it fits into most balanced diets.
Alright, let's break down exactly what goes into this masterpiece...
Inside the Ingredient List
The Flavor Base
At the heart of this dish are the chicken breasts, fresh minced garlic, and a generous amount of grated parmesan. The garlic is the star that provides depth; if you skip it, the dish turns bland and forgettable. Using fresh, whole cloves rather than powdered garlic ensures a bright, punchy flavor. A pinch of Italian seasoning ties everything together, adding an aromatic note that lingers on the palate.
The Texture Crew
Breadcrumbs are the unsung heroes that give the chicken its signature crunch. They absorb the butter and cheese, creating a golden crust that crackles with each bite. If you can’t find breadcrumbs, finely crushed crackers or panko work wonderfully as a substitute. The melted butter is essential; it coats the chicken and prevents it from drying out during cooking.
The Unexpected Star
Lemon zest might seem out of place in a savory dish, but it adds a bright, citrusy lift that balances the richness of the cheese. If you’re not a fan of citrus, a splash of white wine or a dash of Dijon mustard can provide a similar tangy kick. This component is optional, but I swear it makes the dish feel fresh and alive.
The Final Flourish
Fresh parsley adds a pop of color and a mild herbal note that cleanses the palate. A sprinkle of crushed red pepper flakes can turn this into a spicy kick if you’re in the mood for heat. Salt and pepper are always necessary, but be mindful not to over‑season the chicken before baking; the cheese will provide enough saltiness.
Everything's prepped? Good. Let's get into the real action...
The Method — Step by Step
- Prep the Chicken: Pat the chicken breasts dry with paper towels to ensure a crisp surface. Season both sides generously with salt, pepper, and Italian seasoning. This step is crucial; a well‑seasoned base will carry the flavors of the garlic and parmesan throughout. I dare you to taste a piece before you finish cooking – it should already hint at the final flavor.
- Make the Garlic Butter: In a small saucepan, melt the butter over medium heat. Add the minced garlic and sauté until fragrant, about 30 seconds. Be careful not to burn the garlic; if it turns golden brown, it’ll taste bitter. This butter will coat the chicken, keeping it moist and adding a rich, buttery depth.
- Assemble the Crust: In a shallow bowl, combine the breadcrumbs and grated parmesan. Add the garlic butter to the mixture, stirring until the crumbs are evenly coated. The mixture should feel slightly sticky; if it’s dry, add a splash more butter or a teaspoon of olive oil. This coating will form the golden, crispy shell that’s the hallmark of this dish.
- Coat the Chicken: Press each chicken breast into the breadcrumb mixture, ensuring a full coverage on all sides. The crust should cling tightly; if it’s loose, press it down firmly. This step is the moment of truth – the crust is what will make or break the texture of your dish.
- Preheat the Oven: Set your oven to 400°F (200°C). A hot oven is essential for a crisp crust and juicy interior. While the oven heats, place a baking sheet lined with parchment paper or a silicone mat to prevent sticking.
- Bake: Place the coated chicken breasts on the prepared baking sheet. Bake for 20–25 minutes, or until the internal temperature reaches 165°F (74°C). The crust should be golden brown and slightly blistered, indicating caramelization. Watch out: if you open the oven too early, the crust can become soggy.
- Rest the Chicken: Remove the chicken from the oven and let it rest for 5 minutes. This allows the juices to redistribute, ensuring each bite is moist and flavorful. I’ve seen people skip this step, and the result is dry, over‑cooked chicken.
- Finish with Fresh Herbs: Sprinkle chopped parsley and lemon zest over the baked chicken. The fresh herbs add a bright contrast to the rich, buttery crust. If you like a bit of heat, add a pinch of crushed red pepper flakes.
- Serve: Slice the chicken against the grain and serve immediately. Pair it with a simple green salad or a side of roasted vegetables for a complete meal. The aroma alone will have your guests asking for seconds.
That's it — you did it. But hold on, I've got a few more tricks that'll take this to another level. The next section dives into insider tips that even seasoned chefs swear by.
Insider Tricks for Flawless Results
The Temperature Rule Nobody Follows
Many cooks set their ovens to 375°F, assuming it’s the sweet spot. However, 400°F is the sweet spot for this recipe because it creates a crisp crust while keeping the interior moist. The higher temperature caramelizes the parmesan and garlic quickly, giving you that signature golden shell. I’ve tested this in both gas and electric ovens, and the results are consistently superior.
Why Your Nose Knows Best
The aroma of garlic and butter is a reliable indicator of doneness. When the scent becomes rich and buttery with a hint of toasted cheese, the chicken is ready. If you’re unsure, use a meat thermometer; 165°F is the gold standard. I’ve found that relying on the nose saves time and reduces the chance of overcooking.
The 5-Minute Rest That Changes Everything
Resting the chicken for exactly five minutes is critical. It allows the juices to redistribute, preventing them from spilling out when you cut into the meat. Skipping this step often results in dry, stringy chicken. I’ve seen friends who skip it and then lament the loss of moisture.
The Secret of Even Coating
Press the breadcrumb mixture onto the chicken firmly and evenly. If the coating is uneven, the crust will be patchy, and some parts will be soggy. Use a flat spatula to press the crumbs into the meat. This simple technique ensures a uniform, golden crust.
The Quick Butter Upgrade
Replace half of the butter with olive oil for a slightly lighter flavor and a lower fat content. The olive oil adds a subtle fruity note that complements the garlic. Many people use pure butter, but this tweak keeps the dish balanced and delicious.
The Finish Line: Fresh Herbs
Adding fresh parsley at the end brings brightness and color. It also masks any residual buttery taste, creating a more balanced flavor profile. I’ve found that this finishing touch turns a good dish into a great one.
Creative Twists and Variations
This recipe is a playground. Here are some of my favorite ways to switch things up:
Cheesy Jalapeño Burst
Add finely chopped jalapeños to the breadcrumb mixture and sprinkle extra cheddar cheese on top. The heat and sharpness of the jalapeños pair beautifully with the savory garlic and parmesan, creating a spicy kick that’s perfect for summer BBQs.
Mediterranean Medley
Swap the Italian seasoning for oregano and add sun‑dried tomatoes to the breadcrumb mix. Finish with a drizzle of olive oil and a sprinkle of feta cheese. This variation gives the dish a tangy, Mediterranean flair that pairs well with couscous.
Herb‑Infused Creamy Chicken
After baking, pour a splash of heavy cream over the chicken and let it simmer for a minute. The cream soaks into the crumbs, creating a silky sauce. Add fresh thyme or rosemary for an aromatic finish.
Crispy Coconut Crunch
Replace breadcrumbs with shredded coconut and add a teaspoon of curry powder to the coating. The coconut provides a sweet, tropical crunch while the curry adds warmth. Serve with a side of mango salsa for a complete flavor explosion.
Savory Sausage Twist
Slice a spicy Italian sausage into thin rounds and layer them under the chicken before baking. The sausage releases fat that enhances the garlic butter coating, creating a richer, more complex flavor profile.
Breakfast Bonanza
Serve the chicken with a side of scrambled eggs and toast. The savory, cheesy chicken pairs wonderfully with the buttery eggs, turning it into a hearty breakfast or brunch option.
Storing and Bringing It Back to Life
Fridge Storage
Cool the chicken completely before refrigerating. Store in an airtight container for up to 3 days. The crust may soften slightly, but the flavor remains intact. Use a paper towel to absorb excess moisture, keeping the coating crisp.
Freezer Friendly
Wrap the chicken tightly in plastic wrap, then place it in a freezer bag. Store for up to 2 months. When ready to eat, thaw overnight in the refrigerator. Reheat in a 350°F oven for 15–20 minutes, or until heated through.
Best Reheating Method
Add a tiny splash of water to the pan before reheating; this steams the chicken back to perfection and prevents it from drying out. Heat on medium for 5 minutes, then finish in a preheated oven for 5 minutes to restore the crisp crust.