I remember the night my kitchen turned into a smoky battlefield. I was halfway through a bowl of plain mac and cheese, the cheese had browned into a hard crust, and the sauce had turned into a thick, clumpy mess that clung to the pan like a bad ex. I stared at the charred edges, felt the heat radiating off the stove, and thought, “This is not how comfort food should look.” That moment sparked a dare from my friend: “If you can make a chili mac that’s actually good, you owe me a week of pizza.” I accepted the challenge, and what followed was a culinary revelation that I still brag about at every dinner party.
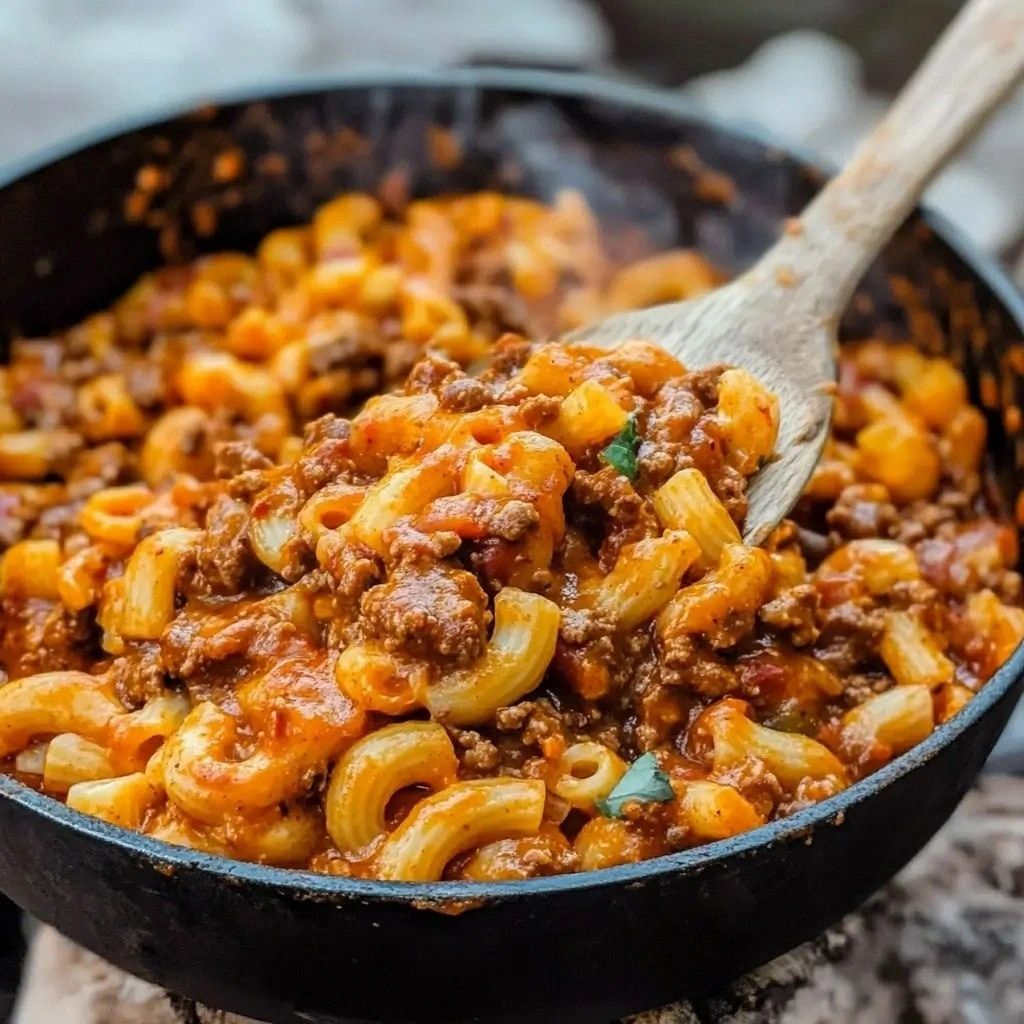
Picture this: the scent of sizzling ground beef mingles with the sharp tang of diced onions and the earthy aroma of cumin. The sound of the skillet’s sizzle is almost a drumbeat, and the visual of red bell pepper ribbons fluttering in the pan feels like a bright splash of summer on a gray kitchen counter. As the sauce thickens, a glossy sheen coats the pasta, turning each elbow into a little boat that swirls with the vibrant red of tomato and the golden flecks of cheese. The texture is a delightful paradox—cheesy, slightly crunchy on the edges, and creamy enough to melt your tongue. Every bite is a layered experience: the heat from the chili powder, the subtle sweetness of tomatoes, the umami punch of beef, and the comforting hug of pasta.
What sets this chili mac apart is a secret blend of ingredients and techniques that elevate it from the ordinary to the unforgettable. I’ve shaved off the usual excess of cheese, added a splash of heavy cream to smooth the sauce, and introduced a breadcrumb crust that turns the top into a crispy, golden finish. I’ve also balanced the heat with a touch of smoked paprika and a dash of cayenne, giving it a smoky depth that lingers on the palate. The result? A dish that’s not just filling, but a symphony of flavors and textures that will make you say, “I dare you to taste this and not go back for seconds.”
This version is hands down the best you’ll ever make at home because it’s simple to follow, forgiving for beginners, yet sophisticated enough to impress seasoned cooks. The method is streamlined, the ingredient list is straightforward, and the final product is a comforting masterpiece that feels like a hug in a bowl. I’ve sprinkled in a few twists—like a breadcrumb topping and a splash of cream—that will change the game. Let me walk you through every single step, and by the end, you’ll wonder how you ever made it any other way.
What Makes This Version Stand Out
- Flavor Depth: The combination of smoked paprika, cumin, and a hint of cayenne creates a layered heat that isn’t overpowering but stays in the memory.
- Texture Play: The crispy breadcrumb crust on top contrasts with the creamy sauce and tender pasta, giving each bite a satisfying crunch.
- Ingredient Quality: Using fresh ground beef and high‑quality cheeses elevates the dish beyond the usual processed versions.
- Make‑Ahead Friendly: The chili mac holds up well in the fridge and tastes even better the next day, making it a perfect week‑night meal.
- Visual Appeal: The glossy sauce and golden breadcrumb topping make the dish Instagram‑worthy without any extra effort.
- Time Efficiency: From prep to plate, the entire process takes less than an hour, which is ideal for busy evenings.
- Crowd‑Pleaser: Whether it’s a family dinner or a potluck, the dish’s comforting nature ensures it’s a hit with all ages.
- Versatility: The recipe can be tweaked for vegetarian or vegan versions, making it inclusive for all dietary preferences.
Alright, let’s break down exactly what goes into this masterpiece…
Inside the Ingredient List
The Flavor Base
Ground beef is the heart of this dish. Choose a lean-to-fat ratio of 80/20 for the best balance between flavor and moisture. If you’re watching calories, 70/30 works too. The beef releases fat that helps bind the sauce, giving it a silky texture. Skipping the beef would turn this into a bland, dry pasta; the meat’s savory juices are essential for depth.
Onions and garlic are the aromatic backbone. They should be sautéed until translucent and slightly golden to unlock their natural sweetness. If you omit them, the sauce loses its foundational flavor, and the dish feels flat. For a vegetarian version, replace the beef with crumbled tofu or lentils, but keep the onions and garlic for the same aromatic effect.
The Texture Crew
Elbow macaroni is the classic choice because its shape holds sauce well. Cook it to al dente—so it retains a slight bite that contrasts with the creamy sauce. If you prefer a softer bite, cook it a minute longer. The pasta’s texture is crucial; overcooked pasta will mush and make the dish feel sloppy.
Heavy cream and milk add richness and a silky mouthfeel. The cream thickens the sauce and balances the acidity of tomatoes. If you’re lactose intolerant, swap heavy cream for coconut milk or a dairy‑free cream alternative. Without cream, the sauce would be thin and less indulgent.
The Unexpected Star
Breadcrumbs, toasted with butter and a pinch of salt, form a crispy topping that adds a delightful crunch. This step transforms the dish from a simple mac and cheese to a gourmet comfort food. If you don’t have breadcrumbs, crushed crackers or panko work as substitutes. Skipping the breadcrumb crust removes a layer of texture that makes the dish memorable.
The Final Flourish
Cheddar and mozzarella cheeses bring a melty, gooey layer that coats the pasta like velvet. The cheddar provides sharpness, while the mozzarella adds stretch and a mild flavor. If you’re looking for a sharper bite, add a sprinkle of Parmesan on top before baking. Removing the cheese will drastically change the dish’s character—without it, you’ll have a savory pasta, not a chili mac.
Everything’s prepped? Good. Let’s get into the real action…
The Method — Step by Step
- Step 1: Sauté Aromatics. Heat a large skillet over medium heat and add 2 tbsp of butter. Once melted, toss in 1 diced onion and 2 minced garlic cloves. Cook until the onion turns translucent and the garlic releases a sweet aroma, about 3 minutes. This step builds the flavor base—don’t skip it.
- Step 2: Brown the Beef. Increase the heat to medium‑high and add 1 lb of ground beef to the pan. Break it apart with a wooden spoon, cooking until it’s browned and no longer pink, roughly 8 minutes. Let the fat render slightly; this will keep the sauce from drying out. If you’re making a vegetarian version, replace beef with crumbled tofu and cook until lightly browned.
- Step 3: Add Veggies. Stir in 1 cup diced red bell pepper and cook for an additional 3 minutes until the pepper softens but still retains a bite. This adds color, sweetness, and a subtle crunch. Watch out: if you add the pepper too early, it may become mushy.
- Step 4: Spice It Up. Sprinkle in 2 tbsp chili powder, 1 tbsp cumin, 1 tsp smoked paprika, 1 tsp oregano, 1 tsp salt, and 1 tsp black pepper. Stir quickly to coat the meat and veggies, letting the spices toast for about 30 seconds. This creates a fragrant base that will carry through the dish.
- Step 5: Tomato Time. Add 1 cup diced tomatoes (canned or fresh) and 2 tbsp tomato paste. Stir until the paste is fully incorporated, then let the mixture simmer for 5 minutes. The tomatoes break down and form a rich sauce that clings to the pasta.
- Step 6: Beans & Cream. Fold in 1 cup drained kidney beans and 1 cup drained black beans. Then pour in 0.5 cup milk and 0.5 cup heavy cream. Stir until everything is well combined and the sauce thickens slightly. The beans add heartiness and the cream smooths the acidity.
- Step 7: Cook Pasta. In a separate pot, bring salted water to a boil and cook 1 lb elbow macaroni to al dente, about 7 minutes. Drain and reserve 1/4 cup of pasta water for later. This pasta will absorb the sauce and become a cohesive dish.
- Step 8: Combine. Add the cooked pasta to the skillet, tossing to coat with the chili sauce. If the sauce is too thick, add a splash of the reserved pasta water to reach your desired consistency. Let everything simmer together for 3 minutes, allowing the flavors to meld.
- Step 9: Cheese Layer. Sprinkle 8 oz shredded cheddar and 4 oz shredded mozzarella evenly over the top. Cover the skillet with a lid and let the cheeses melt for 2 minutes. The melted cheese forms a gooey blanket that binds the dish.
- Step 10: Bake for Crunch. Preheat your oven to 375°F (190°C). Transfer the skillet to the oven (or use a baking dish) and top with 0.25 cup toasted breadcrumbs mixed with 1 tbsp melted butter. Bake for 10 minutes, or until the breadcrumb crust turns golden and the cheese bubbles. This final step gives the dish a satisfying crunch and a caramelized finish.
That’s it— you did it. But hold on, I’ve got a few more tricks that will take this to another level…
Insider Tricks for Flawless Results
The Temperature Rule Nobody Follows
Many cooks think a high oven temperature is always better, but for chili mac, a moderate 375°F (190°C) allows the cheese to melt evenly without burning the breadcrumb crust. I’ve seen people bake at 425°F, and the result is a scorched top and dry center. By keeping the temperature steady, you give the cheese time to emulsify with the sauce, creating that silky, melt‑in‑your‑mouth texture.
Why Your Nose Knows Best
Before you add the beans, give the sauce a quick sniff. If it smells slightly sweet from the tomatoes and a hint of earth from the cumin, you’re on the right track. A sour or metallic scent could mean the tomatoes are past their prime or the spices are stale. Trust your nose; it’s a reliable indicator of flavor quality.
The 5‑Minute Rest That Changes Everything
After baking, let the chili mac rest for 5 minutes before serving. This short pause allows the cheese to set slightly, making it easier to scoop. It also lets the flavors meld further, so each bite is more cohesive. A friend once skipped this step and found the cheese was still oozing, making the dish messy and less enjoyable.
Use a Mix of Cheeses for Depth
While cheddar provides sharpness, adding a splash of gouda or pepper jack can introduce a smoky undertone. If you’re a fan of extra melt, a handful of mozzarella works wonders. Mixing cheeses gives the dish a layered flavor profile that keeps diners coming back for more.
Serve With a Fresh Green Salad
The richness of chili mac pairs beautifully with a crisp, green salad tossed in a light vinaigrette. The acidity cuts through the creamy sauce, balancing the meal. If you’re hosting a crowd, a simple romaine and cherry tomato salad is a quick and refreshing complement.
Creative Twists and Variations
This recipe is a playground. Here are some of my favorite ways to switch things up:
Spicy Jalapeño Kick
Add 1 diced jalapeño to the aromatics step for an extra punch. The heat will linger on the tongue, making the dish ideal for those who like a fiery bite.
Mexican Street Corn Flavor
Stir in 1 cup corn kernels and 1 tbsp lime zest during the sauce simmer. The corn adds a sweet crunch, while the lime zest brightens the overall profile.
Vegan Delight
Replace ground beef with crumbled tempeh or lentils, use dairy‑free cheese, and substitute heavy cream with coconut milk. The result is a plant‑based version that still delivers that comforting, cheesy goodness.
Breakfast Twist
Serve the chili mac with a fried egg on top and a sprinkle of chives. The runny yolk turns the sauce into a rich gravy, making it a hearty breakfast.
Cheesy Baked Potato Layer
Layer sliced baked potatoes between the pasta and the cheese before baking. The potatoes soak up the sauce and add an extra dimension of texture.
Low‑Carb Variation
Swap the elbow macaroni for spiralized zucchini or shirataki noodles. Keep the rest of the ingredients the same for a lighter, keto‑friendly version.
Storing and Bringing It Back to Life
Fridge Storage
Cool the chili mac to room temperature, then transfer it to an airtight container. Store in the refrigerator for up to 4 days. The creamy sauce may thicken slightly; a splash of milk will restore its silky consistency.
Freezer Friendly
For longer storage, freeze the chili mac in freezer‑safe containers for up to 3 months. Thaw overnight in the refrigerator before reheating. The texture remains good, and the flavors intensify.
Best Reheating Method
Reheat gently on the stovetop over low heat, stirring occasionally. Add a teaspoon of water or broth to keep the sauce from drying out. For a crisp top, finish in a preheated oven at 375°F for 5 minutes. The tiny splash of water before reheating steams the dish back to perfection.