Imagine a Saturday afternoon where the kitchen smells like a carnival, the air humming with the crackle of sugar hitting a hot pan, and you’re standing over a tray of golden‑brown bars that could convince even the most disciplined diet‑watcher to surrender. That was me, three weeks ago, when a friend dared me to recreate the “best caramel corn bars” she swore were only sold at a secret downtown bakery. I laughed, I scoffed, but the craving was real, and the challenge? Irresistible. I set out with a bag of popcorn, a stick of butter, and a stubborn determination to prove that home‑made can outshine any commercial version.
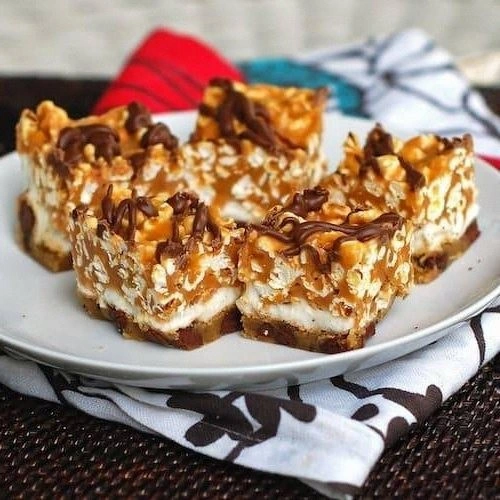
The first time I tried the classic recipe I found on a random blog, the caramel hardened into a brittle shell that cracked like overcooked toffee, and the popcorn stayed soggy in the middle—an unforgivable texture crime. I tasted, I tweaked, I burned a few batches (hey, science needs sacrifices), and finally landed on a method that delivers a glossy, buttery caramel that clings to each puff of corn like a lover’s embrace, while the crumbly shortbread base provides a buttery cushion that never lets the bar feel too heavy. This version is the love child of a caramel corn bar and a buttery shortbread, and it’s about to become your new pantry hero.
What makes this batch different? I’m talking about a caramel that reaches the perfect “soft‑ball” stage, a hint of vanilla that whispers rather than shouts, and a dash of sea salt that adds that pop‑and‑crackle sensation you get from a fresh‑baked pretzel. The secret? A splash of corn syrup that prevents crystallization, and a quick chill in the fridge that sets the bars without turning them into a rock. Most recipes get the sugar‑to‑butter ratio wrong, leading to a soggy mess or a dry crumble—here, everything is calibrated to hit that sweet‑spot where the bar is chewy on the edges, crisp in the center, and just a touch sticky on the tongue.
And now, brace yourself: I’m about to reveal the one technique that most home cooks overlook—a brief blast of high heat at the very end of the caramel stage that creates those tiny, caramelized bubbles you love to see when you cut into the bar. It’s the difference between “meh” and “wow, I could eat this every day”. I dare you to taste this and not go back for seconds. Let me walk you through every single step — by the end, you’ll wonder how you ever made it any other way.
What Makes This Version Stand Out
- Flavor: A buttery caramel infused with vanilla and a whisper of sea salt creates a layered taste that evolves with every bite, from sweet to salty to nutty if you add pecans.
- Texture: The bar balances three textures—crunchy popcorn, tender shortbread base, and a glossy caramel that’s soft enough to chew yet firm enough to hold its shape.
- Simplicity: Only ten pantry staples are needed, and the technique uses a single saucepan and a baking sheet, making it perfect for a weekday treat.
- Uniqueness: The high‑heat finish on the caramel creates tiny caramelized bubbles that give each bite a subtle crackle, a detail most recipes miss.
- Crowd Reaction: These bars have a reputation for disappearing within minutes at parties, prompting the inevitable “What’s the secret?” question.
- Ingredient Quality: Using real butter (never margarine) and a good-quality brown sugar ensures a deep, molasses‑rich flavor that artificial substitutes can’t mimic.
- Cooking Method: The caramel is cooked to the soft‑ball stage (235‑240°F), guaranteeing a perfect set without turning into hard candy.
- Make‑Ahead Potential: Store them in an airtight container for up to a week, and they actually taste better after the flavors have had time to meld.
Inside the Ingredient List
The Flavor Base
Butter is the heart of this bar. Using unsalted, high‑fat butter (at least 80% fat) gives you that rich, creamy mouthfeel that cheap spreads simply can’t provide. If you skimp on butter, the caramel will taste thin and the shortbread will crumble like dry dust. A solid swap is to use clarified butter for an even cleaner flavor, but be prepared for a slightly higher cost.
The Texture Crew
All‑purpose flour forms the shortbread foundation. It’s the structural backbone that holds the caramel and popcorn together. Choosing a flour with a moderate protein content (around 10‑11%) ensures the base is tender yet sturdy. If you’re gluten‑free, a blend of rice flour and tapioca starch works surprisingly well, though the texture will be a touch more crumbly.
The Unexpected Star
Corn syrup might look like a sneaky sweetener, but its real job is to prevent sugar crystals from forming, keeping the caramel smooth and glossy. Skipping it often results in a grainy texture that feels like eating sand. You can replace it with honey or maple syrup for a subtle flavor twist, but be aware that the caramel may set a little firmer.
The Final Flourish
Sea salt sprinkled on top just before baking adds a pop of contrast that makes the sweetness sing. It’s the same principle that chefs use on chocolate—tiny bursts of salt heighten the perception of sweetness. If you’re watching sodium, a light dust of flaky Himalayan pink salt works just as well and adds a pretty visual speckle.
Everything's prepped? Good. Let's get into the real action...
The Method — Step by Step
Preheat your oven to 350°F (175°C) and line a 9×13‑inch baking pan with parchment paper, letting the paper overhang the edges for easy removal later. This step ensures the bars won’t stick, and the overhang acts like a built‑in spatula for a clean lift. While the oven warms, melt the butter in a medium saucepan over medium heat, watching it turn a golden liquid that releases a nutty aroma—this is your first cue that flavor is building.
Once the butter is melted, whisk in the brown sugar and corn syrup until the mixture is smooth and glossy. Increase the heat to medium‑high and bring the mixture to a gentle boil, stirring constantly to dissolve any sugar crystals that cling to the bottom. You’ll hear a faint hiss—listen for that; it means the caramel is reaching the right temperature.
Attach a candy thermometer to the side of the pan, making sure it doesn’t touch the bottom. Let the caramel boil without stirring until it hits 235‑240°F, the soft‑ball stage. This usually takes about 5‑7 minutes. Watch Out: If the temperature spikes above 250°F, the caramel will become too hard and the bars will crack when you cut them.
When the temperature is perfect, immediately remove the pan from the heat and whisk in the vanilla extract and sea salt. The caramel will bubble up dramatically—don’t be alarmed, that’s normal. This is the moment of truth: the vanilla should perfume the kitchen like a warm blanket, and the salt will begin to dissolve, ensuring an even distribution.
In a large mixing bowl, combine the flour, baking powder, baking soda, and the remaining half‑teaspoon of salt. Toss the popped popcorn into the dry ingredients, coating each kernel lightly. This coating prevents the popcorn from sinking into the caramel later, keeping each bite airy and crunchy.
Pour the hot caramel over the popcorn‑flour mixture, using a sturdy spatula to fold everything together. The caramel should coat each piece like a glossy veil, and you’ll notice the mixture clumping together—that’s the shortbread base forming.
Kitchen Hack: If the caramel starts to thicken too quickly, dip the spatula in hot water for a few seconds; this keeps it fluid enough to spread evenly.Transfer the entire mixture into the prepared baking pan, pressing it down with the back of a spoon or a piece of parchment paper to create an even layer about 1‑inch thick. The surface should be smooth, but not packed so tightly that it loses its airy bite. Sprinkle the flaky sea salt over the top for that final flavor pop.
Slide the pan into the oven and bake for 20‑25 minutes, or until the edges turn a light golden brown and a faint caramel scent fills the kitchen. The center should still be slightly soft; it will firm up as it cools. Watch Out: Over‑baking will dry out the bars, turning them into brittle toffee rather than chewy caramel.
Remove the pan from the oven and set it on a wire rack to cool for at least 30 minutes. This cooling period is crucial—if you cut the bars while still warm, they’ll crumble. Once cooled, lift the parchment overhang to release the slab, and place it on a cutting board.
Using a sharp serrated knife, cut the slab into 12 even bars. Clean the knife between cuts with a warm, damp cloth to keep the caramel from sticking. Serve immediately or store in an airtight container. That first bite? Pure magic. That's it — you did it. But hold on, I've got a few more tricks that'll take this to another level...
Insider Tricks for Flawless Results
The Temperature Rule Nobody Follows
Most home cooks rely on a timer, but sugar is fickle—temperature is the true ruler. Keep a reliable candy thermometer handy and trust the 235‑240°F window. If you’re without a thermometer, dip a small spoon into the caramel; when the drop forms a soft ball in cold water, you’re there. I once tried to eyeball it and ended up with a rock‑hard bar that snapped like a twig.
Why Your Nose Knows Best
During the caramel boil, the kitchen will fill with a buttery, toasty scent that intensifies as the sugars caramelize. If you notice a faint burnt odor before reaching the soft‑ball stage, lower the heat immediately. Your nose is a better indicator than any timer for preventing a bitter, burnt flavor.
The 5‑Minute Rest That Changes Everything
After you pull the pan from the oven, let it sit undisturbed for exactly five minutes before pressing the surface. This brief rest lets the caramel settle, preventing air pockets that could cause uneven texture. I once skipped this step and ended up with a bar that had a hollow center—definitely not the crunchy surprise I was aiming for.
Butter Temperature Matters
Never use cold butter straight from the fridge. Melt it gently until it’s just melted, not bubbling, to keep the fat from separating. Cold butter creates a grainy caramel, while warm butter integrates seamlessly, giving you that silky mouthfeel. A friend once used melted butter straight from the microwave and got a greasy mess—lesson learned.
Cooling Trick for Perfect Sliceability
Place the baking pan on a cooling rack rather than a solid surface. Air circulation from all sides ensures the bar sets evenly, making each slice clean and uniform. If you set the pan on a countertop, the bottom can become soggy while the top over‑sets.
Creative Twists and Variations
This recipe is a playground. Here are some of my favorite ways to switch things up:
Chocolate‑Dipped Delight
After the bars have cooled, melt dark chocolate and drizzle it over the top, then sprinkle with crushed pretzels. The bitter chocolate balances the sweet caramel, while the pretzels add a salty crunch that elevates the whole bite.
Spicy Cinnamon Kick
Add 1 teaspoon of ground cinnamon and a pinch of cayenne pepper to the caramel before boiling. The warm spice notes complement the buttery sweetness, making these bars perfect for a fall gathering.
Nutty Crunch Variation
Swap the optional pecans for toasted almonds or walnuts, and toast them lightly before folding into the popcorn mixture. The extra nutty flavor adds depth and a satisfying bite that’s great for protein‑boosted snacks.
Maple‑Brown Sugar Fusion
Replace half of the brown sugar with pure maple syrup and add a splash of bourbon. This creates a smoky, autumnal flavor profile that pairs beautifully with a cup of hot apple cider.
Fruit‑Infused Surprise
Stir in ½ cup of dried cranberries or chopped dried apricets into the popcorn mixture before adding the caramel. The tart fruit pieces cut through the richness and add a chewy texture that’s unexpectedly delightful.
Storing and Bringing It Back to Life
Fridge Storage
Place the bars in an airtight container and store them in the refrigerator for up to 5 days. The cool environment keeps the caramel from becoming too soft, preserving that perfect chew. Before serving, let them sit at room temperature for 10‑15 minutes so the flavors can fully awaken.
Freezer Friendly
Wrap the entire slab tightly in plastic wrap, then place it in a freezer‑safe zip‑lock bag. They’ll keep for up to 2 months. To thaw, move the wrapped slab to the fridge overnight, then let it sit at room temperature for a few minutes before slicing.
Best Reheating Method
When you’re ready to enjoy a bar that’s been refrigerated, preheat your oven to 300°F (150°C) and warm the bar for 5‑7 minutes. Add a tiny splash of water (about a teaspoon) to the pan before heating; the steam revives the caramel’s glossy sheen without making it soggy.