I was in the middle of a frantic weekday dinner rush when my roommate challenged me to make something that would impress even the most skeptical vegetarian. I stared at a sad, wilted bag of button mushrooms and thought, “What if I could turn these humble fungi into a show‑stopper?” The kitchen was a symphony of clattering pans, the faint hum of the fridge, and the lingering scent of last night’s curry. I could almost hear the ticking clock as my thoughts raced faster than the stovetop burners. In that chaotic moment, I promised myself I’d create a mushroom dish that would make even meat‑loving friends question their loyalties.
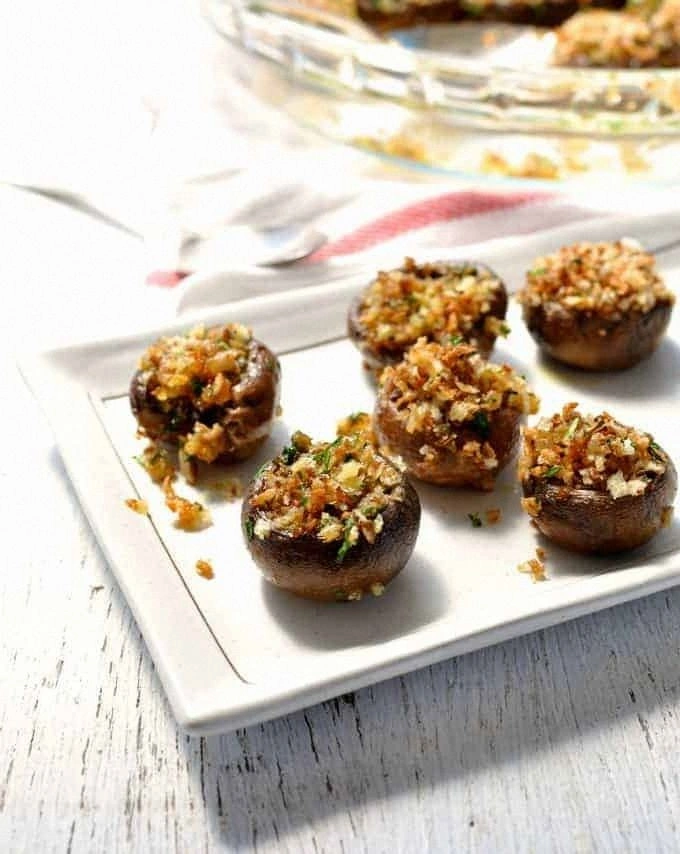
Fast forward three hours of trial, error, and a few too‑many garlic cloves, and I finally nailed it. Imagine a mushroom cap that’s crisp on the outside, buttery on the inside, and packed with a garlicky, herb‑infused stuffing that melts in your mouth like a buttery cloud. The aroma alone is enough to make anyone pause mid‑step and stare at the oven, wondering what alchemy is happening behind that glass door. The secret? A simple blend of olive oil, panko, and fresh herbs that creates a crunchy crown that never gets soggy.
Most recipes I’ve seen either drown the mushrooms in cheese or rely on heavy cream to achieve richness – both of which completely mask the mushroom’s earthy character. This version respects the mushroom’s natural flavor while amplifying it with garlic that’s sautéed just until it whispers “golden perfection.” The result is a bite that’s simultaneously crunchy, tender, and aromatic – a texture trifecta that most home cooks never think a mushroom can deliver.
I’ll be honest — I ate half the batch before anyone else got a chance to try it, and that’s a testament to how addictive this dish truly is. I dare you to taste this and not go back for seconds. Picture yourself pulling these golden caps out of the oven, the whole kitchen smelling like a fragrant forest after a summer rain. Okay, ready for the game‑changer? Let me walk you through every single step — by the end, you’ll wonder how you ever made it any other way.
What Makes This Version Stand Out
- Flavor Explosion: The garlic‑infused stuffing hits your palate like a fireworks display, with each herb adding its own sparkle.
- Texture Harmony: Crispy panko crowns the mushroom while the interior remains moist, creating a contrast that shatters like thin ice.
- Simplicity: Only eight ingredients, all pantry‑friendly, mean you can whip this up without a grocery run.
- Freshness Factor: Fresh thyme and parsley bring a garden‑bright note that balances the earthiness of the mushrooms.
- Crowd‑Pleaser: Even the most die‑hard carnivores confess they’d swap a steak for these caps after the first bite.
- Make‑Ahead Magic: Assemble a day ahead, refrigerate, and bake when you’re ready – perfect for party prep.
- Ingredient Integrity: Using button mushrooms ensures a uniform bite size; the caps hold stuffing without collapsing.
- Cooking Method Mastery: Baking, not frying, keeps the dish light yet delivers that coveted crunch.
Inside the Ingredient List
The Flavor Base
Olive Oil (3 tbsp): This is the silent hero that carries the garlic’s aromatics into every crevice of the mushroom. It also helps the panko brown evenly. If you’re watching calories, opt for a light‑taste olive oil, but don’t skimp – the oil is essential for that golden crunch. A drizzle of avocado oil works as a swap, adding a buttery note.
The Texture Crew
Panko Breadcrumbs (½ cup): Panko is the secret to that airy, melt‑in‑your‑mouth crust. Its larger flakes stay light, unlike regular breadcrumbs that can become soggy. If you’re gluten‑free, use a certified gluten‑free panko or crushed rice‑cereal for a similar effect. Skipping the panko? Expect a mushy, unappealing result.
The Unexpected Star
Garlic (3 large cloves): Garlic is the aromatic backbone. When sautéed just until fragrant, it releases a sweet, caramelized flavor that’s far richer than raw garlic’s bite. If you love a deeper flavor, roast the cloves first; the result is a mellow, almost nutty garlic that pairs beautifully with thyme.
The Final Flourish
Fresh Parsley (1 tbsp) & Fresh Thyme (½ tbsp): These herbs add a bright, herbaceous finish that lifts the dish from “comfort food” to “gourmet.” Parsley contributes a clean, peppery note, while thyme adds an earthy, pine‑like depth. If you’re out of fresh herbs, dried works in a pinch but use only half the amount to avoid bitterness.
Salt & Black Pepper: Two to three pinches of salt awaken all the flavors, while a generous grind of black pepper adds a subtle heat. Skip the salt and you’ll end up with a flat taste; over‑salting, however, can mask the delicate mushroom flavor. Taste as you go – it’s a skill worth mastering.
Everything's prepped? Good. Let's get into the real action...
The Method — Step by Step
Preheat your oven to 400°F (200°C). While the oven warms up, line a baking sheet with parchment paper. This ensures the mushrooms won’t stick and makes cleanup a breeze. The heat will be high enough to crisp the panko without drying out the mushroom caps.
Clean the button mushrooms by gently wiping each cap with a damp paper towel. Remove the stems and set the caps aside, stem side up. This step is crucial – a wet mushroom will steam instead of bake, ruining the texture.
Kitchen Hack: Save the stems! Finely chop them and toss them into the stuffing for an extra layer of mushroom flavor.Finely mince the garlic cloves. In a skillet over medium heat, add the olive oil and let it shimmer. Drop in the garlic and sauté for 45 seconds to a minute, just until it turns a pale gold and releases its perfume. You’ll hear a gentle sizzle – that’s the sound of flavor being built.
Add the chopped mushroom stems (if you saved them) to the skillet, stirring for another 2 minutes until they soften. Then, sprinkle in the panko, parsley, thyme, and a pinch of salt and pepper. Toss everything together until the breadcrumbs are lightly coated and start to toast. The mixture should look golden and slightly fluffy.
Watch Out: Keep the heat on medium; too high and the garlic will burn, turning bitter.Spoon the stuffing into each mushroom cap, pressing gently to fill the cavity. The caps should be heaped just a bit above the rim – that extra height creates a delightful “crust” as it bakes. If you’re feeling fancy, drizzle a whisper of olive oil over the tops for extra sheen.
Arrange the stuffed caps on the prepared baking sheet, spacing them evenly. This allows hot air to circulate, ensuring every cap gets an even golden finish. Slide the sheet into the preheated oven.
Bake for 15‑18 minutes, then switch the oven to broil for the final 2‑3 minutes. Keep a close eye – the panko should turn a deep amber, forming a crisp crust that cracks delicately when you bite. That sizzle when it hits the pan? Absolute perfection.
Kitchen Hack: If the tops aren’t as golden as you’d like, give them a quick spray of olive oil before broiling.Remove the mushrooms from the oven and let them rest for 2 minutes. This short rest lets the interior steam settle, making each bite melt‑in‑your‑mouth. Taste one – the crunch should be audible, the garlic aromatic, and the herbs bright. And now the fun part: serve them hot, straight from the tray, or let them cool for a finger‑food appetizer.
That's it — you did it. But hold on, I've got a few more tricks that'll take this to another level...
Insider Tricks for Flawless Results
The Temperature Rule Nobody Follows
Most home cooks bake at 350°F, assuming slower heat yields a softer interior. In reality, a hot 400°F blast creates that coveted crust while keeping the mushroom tender. If you’re using a convection oven, drop the temp by 20°F and you’ll still achieve the same golden finish. I once tried a lower temp and ended up with soggy caps – a lesson learned the hard way.
Why Your Nose Knows Best
Your sense of smell is a reliable indicator of doneness. When the garlic‑panko mixture starts to emit a nutty, toasty scent, you’re within seconds of perfect crispness. Trust that nose more than a timer; ovens can vary by up to ten degrees.
The 5‑Minute Rest That Changes Everything
After the oven, let the mushrooms sit uncovered for exactly five minutes. This short pause allows the steam inside to redistribute, preventing the stuffing from collapsing. I once rushed plating and the tops fell flat – the rest period saved my presentation.
Herb Timing Mastery
Add fresh herbs at the very end of the sauté, not at the beginning. Heat destroys the bright flavors of parsley and thyme, turning them bitter. By tossing them in just before the panko browns, you lock in that garden‑fresh pop.
The Secret of Even Stuffing
When you scoop the stuffing, use a small ice‑cream scoop for uniform portions. This ensures each cap gets the same amount of crunch and flavor, making the dish look professional. A friend once over‑filled a few caps, and they burst open in the oven – uneven portions are the silent culprits.
Creative Twists and Variations
This recipe is a playground. Here are some of my favorite ways to switch things up:
Cheesy Dream
Add ¼ cup grated Parmesan to the stuffing mixture. The cheese melts into the panko, creating a richer, slightly salty crust that’s irresistible to cheese lovers.
Spicy Kick
Stir in a pinch of crushed red pepper flakes with the garlic. The heat pairs beautifully with the earthiness of the mushrooms, ideal for those who like a little fire.
Mediterranean Flair
Swap parsley for fresh basil and add a handful of chopped sun‑dried tomatoes. The sweet‑tart tomatoes complement the garlic, turning the dish into a Mediterranean bite.
Umami Boost
Mix a tablespoon of finely chopped shiitake mushroom stems into the stuffing. Shiitake adds a deep, smoky umami note that elevates the flavor profile.
Vegan Comfort
Replace olive oil with a splash of coconut oil for a subtle tropical note, and add a drizzle of vegan “parmesan” made from nutritional yeast after baking.
Breakfast Twist
Fold in a lightly beaten egg into the stuffing before baking. The egg binds the mixture and creates a custardy interior, perfect for a brunch spread.
Storing and Bringing It Back to Life
Fridge Storage
Place the cooled stuffed mushrooms in an airtight container and store them in the refrigerator for up to three days. When ready to eat, reheat in a preheated 350°F oven for 8‑10 minutes, adding a tiny splash of water to the pan to create steam that revives the crisp crust.
Freezer Friendly
Arrange the uncooked, stuffed caps on a baking sheet and freeze until solid (about 2 hours). Transfer them to a freezer‑safe bag; they’ll keep for up to two months. Bake directly from frozen, adding an extra 5 minutes to the cooking time.
Best Reheating Method
For ultimate crunch, reheat under the broiler for 2‑3 minutes after a quick microwave “soft” start. The brief broil restores the golden panko while the interior stays moist.