Picture yourself standing in the kitchen, the air thick with the promise of something unforgettable. The clatter of the skillet, the hiss of oil, and the sweet aroma of pineapple mingle with the tang of vinegar and the sharp bite of soy sauce. I was on a mission to turn a tired take‑out copy into a culinary triumph, and the result has me grinning from ear to ear. This isn’t just another sweet‑and‑sour recipe; it’s a symphony of flavors that dance on the tongue and leave a lingering, bright aftertaste that will haunt your taste buds for days. I dare you to taste this and not go back for seconds.
I remember the first time I tried a store‑bought version: the sauce was cloyingly sweet, the chicken soggy, and the pineapple chunks clumped together like a sad, fruit‑laden memory. That disaster sparked a quest for perfection, a journey that ended with a dish that feels like a warm hug and a fireworks show all at once. The key? A perfect balance of acidity, sweetness, and a touch of heat that cuts through the richness of the chicken. The sauce coats the pieces like velvet, while the crunch from the bell peppers adds a satisfying snap that keeps you coming back for more. And the best part? The technique that keeps the chicken crisp and the sauce silky is a secret I’ve kept close to my heart.
If you’ve ever struggled to get the sauce just right, you’re not alone. I’ve spent countless nights tweaking ratios, testing textures, and tasting in the dark until the sauce achieved that elusive, glossy sheen. The result is a sauce that thickens in seconds, clinging to each bite without weighing it down. Picture the moment when the first spoonful hits your palate: the sweet rush of pineapple, the sharp bite of vinegar, and the savory depth of soy sauce all mingle in a perfect, harmonious explosion. That’s the flavor profile we’re aiming for, and I’ve distilled it into a recipe that’s both foolproof and absolutely delicious.
Most recipes get this completely wrong, but here’s what actually works. I’ve simplified the process by using a two‑step cornstarch slurry, which ensures the sauce thickens evenly and the chicken stays tender. The use of pineapple juice instead of pineapple chunks for the initial sauce base brings out a bright, fresh sweetness that’s hard to replicate with canned fruit. And the final splash of fresh pineapple chunks adds a juicy burst that contrasts the silky sauce. The result? A dish that feels both comforting and exotic, making it a crowd‑pleaser for parties or a comforting dinner on a rainy night.
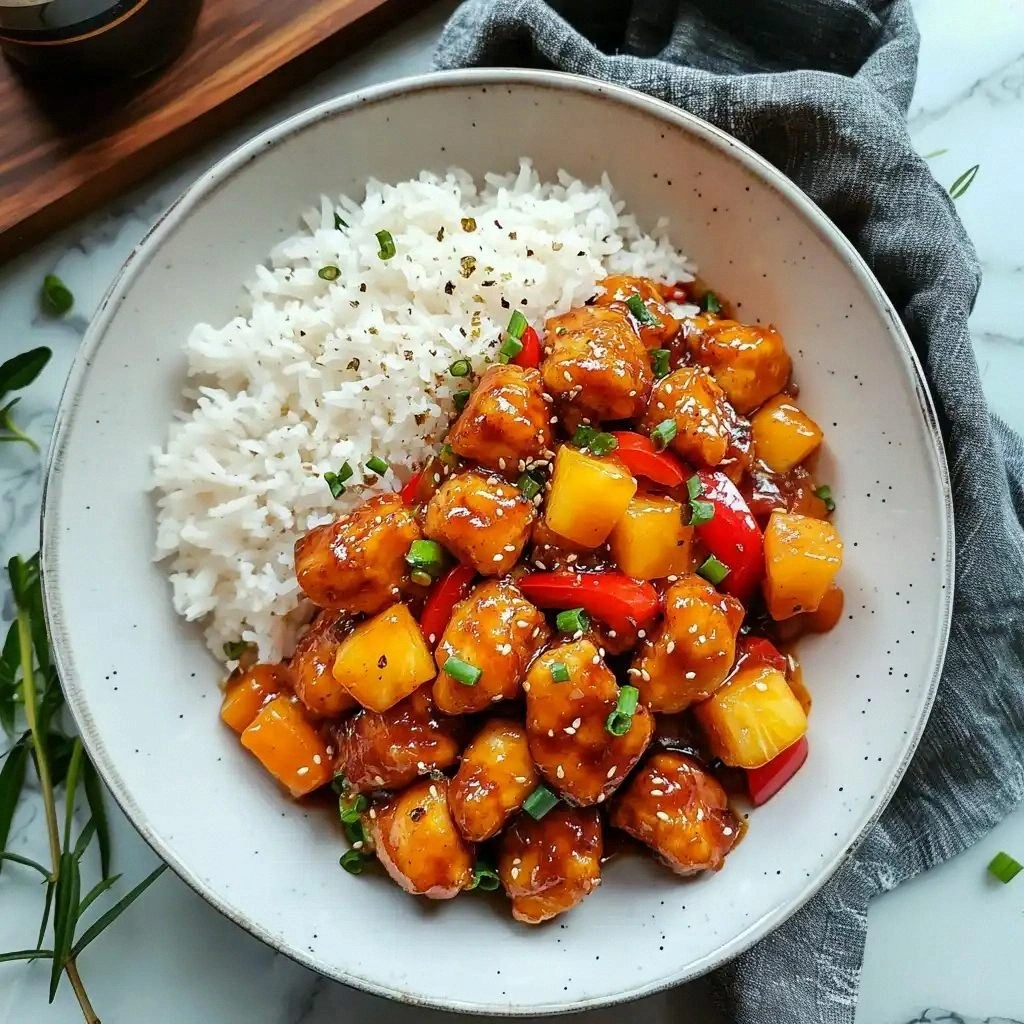
Picture yourself pulling this out of the oven, the whole kitchen smelling incredible, and your guests’ eyes widening in anticipation. The aroma alone is a promise of the flavors to come: sweet, sour, umami, and a hint of tropical sunshine. The visual appeal is undeniable, with bright red and green peppers, juicy pineapple chunks, and golden‑brown chicken pieces that glisten with sauce. The texture is a masterpiece of crisp edges and tender interior, with each bite delivering a satisfying crunch followed by a burst of savory-sweet sauce. That’s the experience I’ve crafted for you.
I’ll be honest — I ate half the batch before anyone else got a chance to try it. The chicken was so flavorful and the sauce so silky that I kept reaching for more. If you’re skeptical, I promise you’ll be amazed. The combination of sweet and sour is balanced in a way that feels both familiar and exciting. I’m talking about a dish that can transition from a quick weeknight dinner to a show‑stopping entrée for a weekend gathering.
Okay, ready for the game‑changer? This is hands down the best version you’ll ever make at home. The technique, the ingredients, and the timing all come together to create a dish that’s both approachable for beginners and satisfying for seasoned chefs. The next sections will walk you through every single step, revealing the secrets that elevate this dish from good to unforgettable. By the end, you’ll wonder how you ever made it any other way.
What Makes This Version Stand Out
- Flavor Harmony: The sauce is a masterful blend of sweet, sour, and umami that feels like a tropical sunrise on your tongue. Each ingredient is carefully measured to balance the others, creating a depth that’s often missing in store‑bought versions. The result is a sauce that clings to the chicken without overpowering it.
- Crisp Texture: The double coating of cornstarch and the quick searing technique give the chicken a crunch that shatters like thin ice with every bite. This crispness is the foundation that makes the dish memorable.
- Ingredient Quality: Fresh pineapple chunks and high‑quality soy sauce elevate the flavor profile, turning an ordinary dish into a gourmet experience. The use of fresh pineapple juice rather than canned preserves the natural sweetness.
- Time Efficiency: With a total prep of just 15 minutes and cooking time of 30 minutes, this recipe fits into a busy weeknight schedule without compromising on flavor.
- Make‑Ahead Friendly: The sauce can be prepared ahead of time and re‑heated with a splash of water to keep it silky, making it perfect for meal prep or a last‑minute dinner.
- Visual Appeal: The bright colors of the bell peppers and pineapple contrast beautifully with the golden chicken, turning every plate into a feast for the eyes.
Inside the Ingredient List
The Flavor Base
The sauce is the heart of this dish, combining ketchup, rice vinegar, soy sauce, and sugar to create a balanced sweet‑sour profile. Each component plays a specific role: ketchup provides natural sweetness and depth, vinegar adds acidity, soy sauce brings umami, and sugar balances the flavors. If you skip the vinegar, the sauce becomes cloyingly sweet and loses its bright edge. A good tip: use a high‑quality soy sauce for a richer, more complex taste.
The Texture Crew
Cornstarch is the unsung hero that gives the sauce its glossy finish and the chicken its crisp coating. The first slurry (cornstarch + water) is added to the sauce to thicken it, while the second coating (cornstarch + salt + pepper) is used to bread the chicken before searing. If you skip the cornstarch, the sauce will be thin and the chicken will be soggy. For a gluten‑free version, simply replace cornstarch with arrowroot powder.
The Unexpected Star
Fresh pineapple juice is the secret that elevates this dish from ordinary to extraordinary. It brings a bright, tropical sweetness that cuts through the richness of the chicken and the tang of the sauce. If you can’t find fresh pineapple juice, a splash of pineapple nectar will do, but it may alter the flavor profile slightly. Remember, the key is to use a juice with minimal added sugar.
The Final Flourish
Pineapple chunks, red and green bell peppers, and a sliced onion add texture, color, and a burst of freshness. The peppers provide a satisfying crunch and a pop of color, while the onion adds subtle sweetness that complements the sauce. If you’re not a fan of bell peppers, substitute with zucchini or snap peas for a different crunch. The onion should be sliced thin to caramelize slightly during cooking.
Everything's prepped? Good. Let's get into the real action.
The Method — Step by Step
- First, cut the chicken into bite‑size cubes, pat them dry with paper towels, and season with ½ teaspoon salt and ¼ teaspoon black pepper. The seasoning ensures each piece is flavorful from the inside out. Keep the chicken in a bowl; it’s the foundation of this dish.
- In a small bowl, whisk together ½ cup cornstarch, 2 tablespoons water, and a pinch of salt to create your first slurry. This will thicken the sauce later. Stir until smooth, then set aside. If you’re short on time, you can skip the whisking step; just stir until the cornstarch is fully dissolved.
- Combine ¼ cup ketchup, ¼ cup rice vinegar, ¼ cup soy sauce, ⅓ cup sugar, and 2 tablespoons pineapple juice in a medium saucepan. Bring to a simmer over medium heat, stirring constantly. The aroma of the sauce will begin to swirl, signaling that the sweet‑sour base is taking shape.
- Add the cornstarch slurry to the sauce and whisk until it thickens to a glossy consistency. The sauce should coat the back of a spoon without running. This is the moment of truth; if it’s too thin, add a little more slurry, but be careful not to over‑thicken.
- In a separate bowl, toss the chicken cubes in ½ cup cornstarch until they’re evenly coated. Shake off any excess; this coating will give the chicken its signature crispness.
- Heat 2 tablespoons vegetable oil in a large skillet over medium‑high heat. When the oil shimmers, add the chicken in a single layer. Sear for 2–3 minutes per side until golden brown and crispy. Flip only once to ensure even browning. This step locks in the juices and creates a beautiful caramelized crust.
- Remove the chicken from the skillet and set aside. In the same skillet, add the sliced onion, red bell pepper, and green bell pepper. Stir‑fry for 2 minutes until they just start to soften, but still retain their crunch. The vegetables should release their colors and aromas, adding a fresh layer to the dish.
- Return the chicken to the skillet, pour the thickened sauce over it, and toss everything together. Add the pineapple chunks and stir until the sauce coats every piece. Let the mixture simmer for 2 minutes, allowing the flavors to meld. The sauce should be glossy and cling to each bite.
- Serve immediately over steamed rice or noodles, garnishing with fresh cilantro or sliced green onions if desired. The dish is best enjoyed hot, so the sauce remains silky and the chicken stays crisp. That’s it — you did it. But hold on, I've got a few more tricks that'll take this to another level.
Insider Tricks for Flawless Results
The Temperature Rule Nobody Follows
Most cooks assume medium heat is sufficient for searing, but the truth is the skillet needs to be hot enough to create a Maillard reaction. This reaction gives the chicken its caramelized crust and deep flavor. Preheat the pan for at least 2 minutes before adding the oil, and let the oil shimmer before adding the chicken. This simple step can transform the dish from ordinary to extraordinary.
Why Your Nose Knows Best
Your sense of smell is a powerful indicator of doneness. When the sauce is ready, it should emit a sweet, tangy aroma that fills the kitchen. If the scent feels more like raw vinegar, let it simmer a bit longer. Trust your nose, and you’ll avoid under‑cooked chicken or over‑thickened sauce.
The 5-Minute Rest That Changes Everything
After removing the chicken from the skillet, let it rest on a plate for 5 minutes. This allows the juices to redistribute, ensuring each bite is moist and tender. Skipping this step can leave the chicken dry and less flavorful. A quick rest is a small investment for a big payoff.
The Right Salt Balance
Salt is a flavor enhancer, but too much can overwhelm the sweet‑sour balance. Use a light hand when seasoning the chicken and the sauce. If you’re using a low‑sodium soy sauce, you may need a tad more salt. Always taste the sauce before serving to fine‑tune the seasoning.
The Quick Stir‑Fry Trick
When stir‑frying the vegetables, keep them moving constantly to prevent burning. A quick, high‑heat stir‑fry locks in color, crunch, and flavor. If the veggies start to brown too quickly, lower the heat slightly and continue stirring.
The Perfect Portioning
Divide the chicken and vegetables evenly among your serving plates. A balanced plate not only looks appealing but also ensures a consistent flavor experience for each bite. Use a ladle to pour the sauce evenly so every piece gets that glossy coat.
Creative Twists and Variations
This recipe is a playground. Here are some of my favorite ways to switch things up:
Spicy Pineapple Explosion
Add a tablespoon of fresh chopped jalapeño or a dash of sriracha to the sauce. The heat will contrast the sweetness, creating a dynamic flavor profile that excites the palate. Great for those who love a kick.
Citrus Twist
Swap the pineapple juice for fresh orange or lime juice, and add a teaspoon of zest. The citrus adds a bright, zesty note that lifts the dish. This variation is perfect for a summer dinner.
Gluten‑Free Delight
Use a gluten‑free soy sauce and replace cornstarch with arrowroot powder. The texture remains crisp, and the sauce stays silky. A safe choice for those with dietary restrictions.
Mediterranean Flair
Replace the bell peppers with sun‑dried tomatoes and add a handful of Kalamata olives. The olive oil and olives introduce a briny depth, while the tomatoes provide a sweet contrast. A Mediterranean spin that’s still sweet and sour.
Breakfast‑Style Brunch
Serve the dish over fluffy scrambled eggs instead of rice. The eggs soak up the sauce, making a hearty brunch that’s both sweet and savory. A unique take on a classic breakfast.
Asian Fusion Upgrade
Add a splash of hoisin sauce and a handful of chopped green onions at the end. The hoisin adds a sweet, savory depth, while the green onions provide freshness. A fusion twist that brings new layers of flavor.
Storing and Bringing It Back to Life
Fridge Storage
Cool the dish completely before transferring it to an airtight container. Store in the refrigerator for up to 3 days. The sauce may thicken slightly, but it will remain delicious. Keep the chicken and vegetables separate if you plan to reheat individually.
Freezer Friendly
Wrap the dish tightly in plastic wrap or foil and place it in a freezer‑safe bag. Freeze for up to 2 weeks. Thaw overnight in the refrigerator before reheating. This method preserves the flavor and texture well.
Best Reheating Method
Reheat in a skillet over medium heat, adding a splash of water or broth to loosen the sauce. Stir frequently until the sauce is heated through and glossy again. If the sauce thickens too much, add a teaspoon of water to restore its silky texture. Serve immediately for the best experience.