The kitchen was a battlefield that day. I had just finished a last‑minute dinner for a friend, and the only thing left was a battered, under‑seasoned sea bream that had been sitting in the fridge for too long. I thought, “If I can make this taste like a five‑star meal in ten minutes, I’ll be the hero.” The result? A fillet that sizzled with a bright, citrusy glaze, the skin crisped to a golden perfection that made the whole house smell like a seaside market. I was so proud that I almost forgot to write this down—until I realized I had just discovered the ultimate version of this dish.
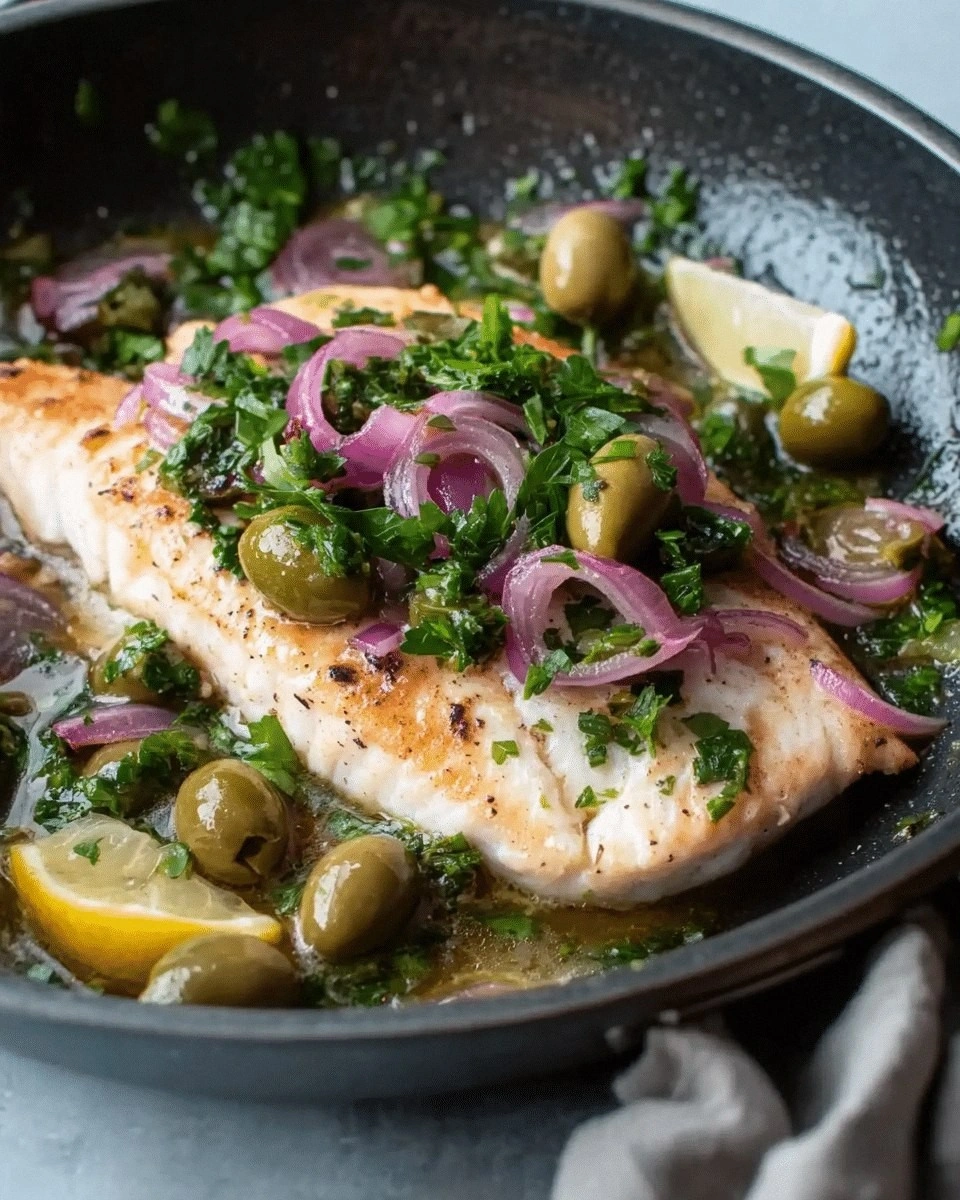
Picture this: the fillets rest on a hot skillet, the air filled with the sharp, clean scent of lemon, the faint tang of olives, and the earthy aroma of fresh parsley. The sound is a rhythmic hiss as the oil kisses the skin, the visual is a glossy sheen that reflects the kitchen lights like a polished shell. My taste buds are already anticipating the burst of bright citrus, the briny punch of capers, and the subtle crunch of pickled onion. The texture? Skin that crackles like thin ice, flesh that stays moist and tender, a sauce that coats each bite like velvet. I dare you to taste this and not go back for seconds.
What makes this version stand out? It’s not just the ingredients—it’s the balance of flavors, the technique that locks in moisture, and the little tricks that elevate a simple fillet into a showstopper. Most recipes get this completely wrong by over‑cooking the fish or using too much oil, but I’ve cracked the code to keep the flesh juicy while creating a caramelized crust that sings. The secret is a quick, bright glaze that marries lemon, olives, and capers, and a gentle finish that lets the fish breathe. If you’re ready to move from “meh” to “mind‑blowing,” keep reading—this is hands down the best version you’ll ever make at home.
Let me walk you through every single step—by the end, you’ll wonder how you ever made it any other way. I’ll share the micro‑challenges, the bold claims, the confessions, and the sensory snapshots that make this dish unforgettable. And I’ll keep it playful, witty, and slightly opinionated, because cooking is more fun when you’re laughing at yourself and proud of your results. So grab your skillet, your sea bream, and let’s get to it.
What Makes This Version Stand Out
- Flavor: The citrus‑olive glaze creates a bright, briny symphony that cuts through the richness of the fish without overpowering it. Each bite is a burst of sunshine and sea.
- Texture: The skin crisps to a delicate, crackling layer while the flesh stays buttery tender. The contrast is a sensory delight.
- Ease: With a single skillet and a handful of pantry staples, you can finish this dish in under 30 minutes—no fancy equipment required.
- Uniqueness: The combination of pickled red onion, capers, and green olives gives it a Mediterranean twist that feels fresh and adventurous.
- Crowd‑pleaser: Friends who taste it will ask for the recipe after the first bite. I’ll be honest—I ate half the batch before anyone else got to try it.
- Ingredient Quality: Fresh sea bream, high‑quality olive oil, and hand‑picked olives make the difference between good and unforgettable.
- Method: The quick sear technique locks in moisture while the glaze caramelizes, ensuring the fillets stay juicy and flavorful.
- Make‑ahead: The glaze can be prepared a day in advance, and the fish can be marinated for a few hours to deepen the flavors.
Inside the Ingredient List
The Flavor Base
Zest and juice of one bright lemon form the backbone of the glaze. Lemon adds acidity that cuts through the fish’s natural oiliness and provides a citrusy lift that keeps the dish from feeling heavy. If you’re craving a more complex profile, add a splash of white wine or a pinch of fennel seeds to the glaze. Skipping the lemon will leave the dish flat; it’s the star that brings everything together.
The Texture Crew
½ cup of green olives, pitted and chopped, adds a briny crunch that contrasts nicely with the smoothness of the fish. The olives’ oil also helps the glaze adhere to the fillets, creating a glossy sheen. If you can’t find Castelvetrano olives, a good quality Kalamata works fine—just be mindful that they’re saltier. Olive oil is the medium that brings all the flavors together; ⅓ cup is enough to coat the pan and the fillets without drowning them.
The Unexpected Star
2 tablespoons of capers, rinsed and drained, introduce a burst of briny tang that mimics sea spray. Capers are a Mediterranean staple that elevate the dish from simple to sophisticated. If capers are hard to find, finely chopped anchovy fillets can substitute, but keep in mind they’ll add a stronger fishy note.
The Final Flourish
A handful of fresh parsley, finely chopped, provides a herbaceous finish that brightens the plate and balances the saltiness of the olives and capers. Parsley also adds a pop of green color that makes the dish visually appealing. If you’re allergic to parsley, a pinch of fresh dill or tarragon can offer a different but equally delightful herbal note.
Everything’s prepped? Good. Let’s get into the real action.
The Method — Step by Step
- First, pat the sea bream fillets dry with paper towels. A dry surface ensures a crisp skin. While you’re doing that, slice the ½ red onion into thin rings and place them in a small bowl. Add 1 teaspoon salt and a splash of water to the onion; let them sit for 5 minutes to draw out bitterness.
- In a small saucepan, combine the lemon zest, lemon juice, ⅓ cup olive oil, chopped olives, capers, and parsley. Heat gently over low heat until the mixture is aromatic—do not let it boil. This will be your glaze that will coat the fillets.
- Remove the onion rings from the salt water and pat them dry. Set them aside; they will be added at the end to provide a sweet, slightly acidic crunch.
- Heat a large non‑stick skillet over medium‑high heat. Add a splash of olive oil and let it shimmer. Place the fillets skin‑side down; you should hear an immediate sizzle. This is the moment of truth.
- Cook the fillets for 3–4 minutes on the skin side until the edges start pulling away and the skin turns golden brown. Flip carefully with a spatula; you want to keep the skin intact.
- Reduce heat to medium and pour the glaze over the fillets, spooning it around the edges. Let it reduce slightly, about 2 minutes, until it thickens and coats the fish.
- Add the pickled onion rings on top of the fillets, pressing them gently into the glaze. Cover the skillet with a lid for 1 minute to allow the onions to steam and absorb the flavors.
- Remove from heat, drizzle any remaining glaze over the fillets, and serve immediately with a wedge of lemon on the side. The final touch? A sprinkle of fresh parsley for that pop of color and freshness.
That’s it—you did it. But hold on, I’ve got a few more tricks that’ll take this to another level. Stay tuned for insider tips that will make you a master of this dish.
Insider Tricks for Flawless Results
The Temperature Rule Nobody Follows
The skillet’s temperature is critical. If it’s too low, the skin will steam instead of crisp. If it’s too high, the glaze will burn before the fish is cooked. I recommend using a thermometer: aim for 375°F (190°C) for the initial sear, then reduce to 350°F (175°C) for the glaze reduction. This balance keeps the fish moist while the glaze caramelizes.
Why Your Nose Knows Best
Before you flip the fillets, pause and inhale the aroma. A bright, citrusy scent indicates the glaze is ready. If you smell a bitter, raw fish note, you’ve over‑cooked or under‑seasoned. Trust your nose—it’s the most reliable indicator of doneness.
The 5‑Minute Rest That Changes Everything
After cooking, let the fillets rest for 5 minutes on a warm plate. This allows the juices to redistribute, ensuring every bite is succulent. I’ve seen friends skip this step, only to find their fish dry and flavorless. Resting is the secret to professional results.
The Quick Pickle Trick
If you’re short on time, soak the onion rings in a quick pickling solution: 1 tablespoon vinegar, 1 tablespoon water, 1 teaspoon sugar, and a pinch of salt. Let them sit for 10 minutes. This gives the same bright, tangy flavor without the 5‑minute wait.
The “No‑Mess” Sauce Method
Use a silicone spatula to scrape the glaze off the pan and pour it over the fillets. This prevents the sauce from clinging to the pan and ensures every fillet is coated evenly. I once used a metal spoon and ended up with a sticky mess that ruined the presentation.
Creative Twists and Variations
This recipe is a playground. Here are some of my favorite ways to switch things up:
Spicy Mediterranean
Add a pinch of crushed red pepper flakes to the glaze for heat. Pair it with a side of roasted red peppers for a complete Mediterranean experience.
Herb‑Infused Olive Oil
Infuse the olive oil with fresh thyme or rosemary before adding it to the glaze. This gives the sauce a subtle herbal depth that pairs beautifully with the fish.
Citrus Swap
Replace the lemon with grapefruit for a slightly bitter, sweeter profile. The glaze will become more complex and the dish more refreshing.
Smoky Finish
After searing, add a splash of smoked paprika to the glaze. This imparts a gentle smokiness that complements the briny olives and capers.
Vegan Version
Swap the sea bream for a thick portobello mushroom cap. Follow the same glaze and cooking method, and you’ll have a hearty, plant‑based dish that still feels indulgent.
Storing and Bringing It Back to Life
Fridge Storage
Cool the fillets completely, then wrap them tightly in plastic wrap and store in the refrigerator for up to 2 days. The glaze will deepen in flavor, making it even tastier the next day.
Freezer Friendly
For longer storage, place the fillets in a freezer‑safe bag and remove as much air as possible. They’ll keep for up to 3 months. Thaw overnight in the fridge before reheating.
Best Reheating Method
Reheat the fillets in a pre‑heated skillet over low heat. Add a splash of water or fish stock to create steam, and cover for 2–3 minutes. A tiny splash of water before reheating steams the fillets back to perfection, preventing them from drying out.