I was halfway through a midnight taco frenzy when the kitchen decided to throw a curveball. The tortilla shells were soggy, the cheese had turned into a sad puddle, and the jalapeños were screaming for attention. I stared at the mess, then decided to turn that disaster into destiny. This is the story of how I stumbled upon the ultimate Jalapeño Popper Cheesy Chicken, a dish that turns ordinary leftovers into a show‑stopping feast.
Picture this: a sizzling skillet, the aroma of bacon curling into buttery clouds, the bright green of fresh jalapeños cutting through the heat, and the rich, molten swirl of cheddar and Monterey Jack melting over shredded chicken. The sound of the sauce thickening is a comforting crackle, like a campfire in a pan. The first bite is a symphony—spicy heat, creamy melt, and the satisfying crunch of a perfectly toasted tortilla. Every sense is engaged, and every bite feels like a celebration.
What makes this version stand out? It’s the blend of textures, the depth of flavor, and the sheer simplicity that lets each ingredient shine. I’ve stripped away the fluff and added a few secret twists that elevate the dish from good to unforgettable. This isn’t just another chicken casserole; it’s a culinary handshake that says, “You’re going to love this.”
I dare you to taste this and not go back for seconds. Picture yourself pulling this out of the oven, the whole kitchen smelling incredible, and the first bite revealing a creamy, spicy hug that stays with you. Let me walk you through every single step—by the end, you’ll wonder how you ever made it any other way.
What Makes This Version Stand Out
- Flavor Layering: Each ingredient is chosen to build depth—smoky bacon, sharp cheddar, and mellow Monterey Jack create a flavor pyramid that satisfies every palate.
- Texture Contrast: The crispy edges of the tortillas meet the silky sauce, producing a bite that oscillates between crunch and melt.
- Ingredient Quality: Using fresh jalapeños and high‑fat cream cheese gives the dish a richness that store‑bought mixes can’t match.
- Heat Control: The jalapeños are sliced thinly, then lightly sautéed to temper their bite, ensuring the heat is present but not overwhelming.
- Time Efficiency: The entire process takes under an hour, making it ideal for busy week‑nights without sacrificing flavor.
- Make‑Ahead Friendly: You can assemble the dish a day early, refrigerate, and bake right before serving—no compromise on taste.
- Crowd‑Pleaser: Friends and family rave about the gooey center and the bold, yet balanced, spice level.
Inside the Ingredient List
The Flavor Base
Shredded chicken is the backbone, providing a protein-rich canvas that absorbs every flavor. Fresh jalapeños add a bright, peppery punch that cuts through the richness of the cheeses. Bacon, cooked until crisp, offers smoky undertones and a satisfying crunch. Together, these ingredients create a savory foundation that’s both comforting and exciting.
The Texture Crew
Flour tortillas are the vessel, offering a pliable exterior that holds the filling while crisping on the edges. Butter and all‑purpose flour form a roux that thickens the sauce, giving it a silky mouthfeel. Cream cheese and a blend of cheddar and Monterey Jack melt into a velvety sauce that clings to the chicken and tortillas alike. The result is a harmonious balance of creamy and crunchy.
The Unexpected Star
The 0.5 teaspoon each of garlic and onion powder might seem modest, but they’re the secret architects of depth. They provide a subtle umami backdrop that elevates the dish without overpowering the primary flavors. If you’re feeling adventurous, a pinch of smoked paprika can add an extra layer of smokiness.
The Final Flourish
Fresh cilantro, diced tomatoes, and sliced green onions aren’t just garnish—they’re the finishing touch that adds brightness and a pop of color. They also provide a fresh contrast to the rich, creamy core. A squeeze of lime at the table can elevate the dish with a citrusy zing, if you’re in the mood.
Everything’s prepped? Good. Let’s get into the real action.

The Method — Step by Step
- Preheat your oven to 375°F (190°C). While the oven warms, slice the jalapeños thinly, removing seeds if you prefer a milder kick. In a large skillet over medium heat, lay the bacon strips side by side. Cook until the edges turn golden and the fat has rendered, about 6-8 minutes. Once crisp, transfer the bacon to a paper‑towel‑lined plate to drain, then crumble into bite‑size pieces. The sizzling bacon will be the first aroma that tells you you’re on the right track.
- In the same skillet, reduce the heat to low and add the butter. Let it melt, then sprinkle in the flour, whisking constantly to create a smooth roux. This step is crucial for thickening the sauce without lumps. Cook the roux for about 1 minute, just until it turns a light golden color. The sound of the whisking is a subtle cue that your sauce base is forming.
- Gradually pour in the milk while whisking vigorously to keep the mixture silky. Once the sauce starts to thicken, season with garlic powder and onion powder. Keep whisking until the sauce is a glossy, even consistency. The aroma of the milk and spices will begin to mingle, promising a comforting, savory experience.
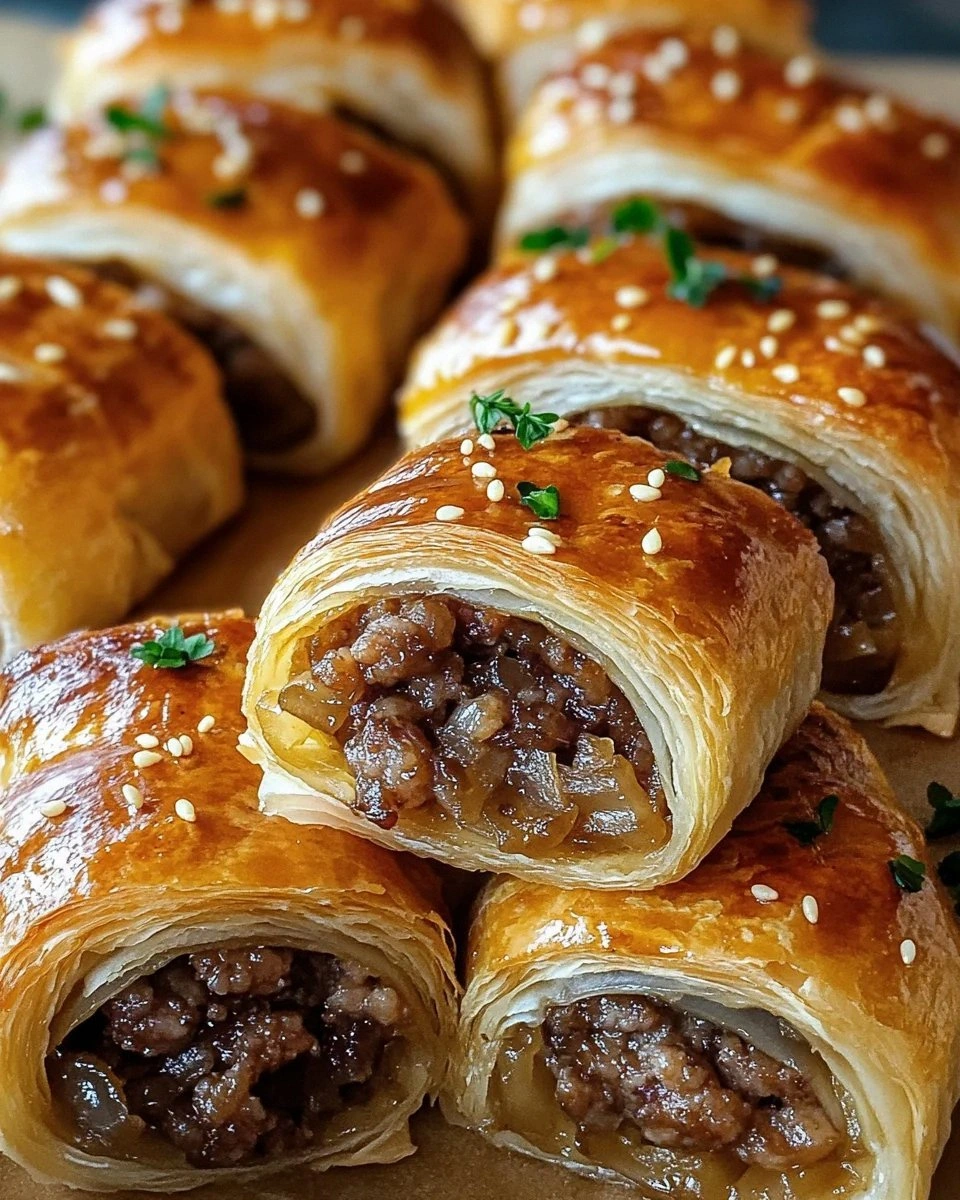
- Reduce the heat to low and fold in the cream cheese, stirring until it’s fully melted and the sauce turns silky smooth. Next, add the shredded cheddar and Monterey Jack, letting them melt into the mixture. The cheeses will give the sauce a luxurious, velvety texture that clings to every bite. Once the sauce is smooth, stir in the shredded chicken, fresh jalapeños, and crumbled bacon. The mixture should look like a glossy, colorful swirl of flavors.
- Warm the tortillas in a dry skillet or microwave until pliable. Lay a tortilla flat, spoon a generous amount of the sauce mixture onto the center, and roll tightly. Repeat until all tortillas are filled. Arrange the rolled tortillas seam‑side down in a greased baking dish, leaving a small space between each. The warm tortillas will steam slightly, creating a soft, almost bread‑like exterior.
- Pour the remaining sauce evenly over the assembled rolls, ensuring each one is coated. Sprinkle a generous layer of the remaining cheddar and Monterey Jack on top, creating a golden, bubbly crown. This layer will crisp up beautifully in the oven, giving the dish a delightful contrast between gooey center and crunchy top.
- Bake in the preheated oven for 20–25 minutes, or until the cheese is melted, bubbly, and the edges of the tortillas turn a golden brown. The first time you open the oven, you’ll smell a heady blend of bacon, cheese, and jalapeños—an aroma that makes the whole kitchen feel like a fiesta. Once baked, let the dish rest for 5 minutes before serving to allow the flavors to settle. The final result is a comforting, cheesy, spicy masterpiece that will have everyone asking for seconds.
That's it — you did it. But hold on, I've got a few more tricks that'll take this to another level.
Insider Tricks for Flawless Results
The Temperature Rule Nobody Follows
Keep the sauce on low heat after adding the cheeses. If the temperature rises too high, the cheeses can separate, leaving a greasy mess. A steady, gentle simmer ensures a creamy, cohesive sauce that coats every inch of the chicken.
Why Your Nose Knows Best
When the sauce begins to thicken, you’ll notice a subtle shift in aroma—an almost buttery scent that signals the perfect consistency. Trust that cue; if you’re unsure, give it a gentle stir and watch the texture smooth out. The nose is your best ally in achieving that silky finish.
The 5‑Minute Rest That Changes Everything
After baking, let the dish rest for five minutes before slicing. This brief pause allows the cheese to set, preventing a runny mess when you cut into it. The rest period also lets the flavors meld, giving each bite a deeper, more harmonious taste.
The Perfect Bacon Crunch
If you like extra crunch, reserve a handful of the bacon before crumbling it into the sauce. Fold this reserved bacon back into the rolls just before baking. It adds a delightful textural contrast that elevates each bite.
The Jalapeño Balance
If you’re a heat‑conscious cook, remove the seeds and membranes before slicing. This reduces the spiciness while preserving the bright green color and fresh flavor. For those who love a kick, leave the seeds in and double the quantity of jalapeños.
The Quick Sauce Fix
When the sauce is too thick, add a splash of milk or broth, whisking until it reaches the desired consistency. This trick saves the dish from drying out and keeps the cheese melt perfectly smooth.
Creative Twists and Variations
This recipe is a playground. Here are some of my favorite ways to switch things up:
Mexican Street Taco Version
Swap the tortillas for corn tortillas, add a drizzle of lime crema, and sprinkle fresh cilantro on top. The result is a lighter, more authentic street‑taco flavor that pairs well with a cold beer.
Paleo Powerhouse
Use almond flour instead of all‑purpose flour, and replace the milk with coconut milk. The dish stays creamy but fits a paleo lifestyle, and the coconut adds a subtle tropical hint.
Cheese Lover’s Dream
Add a handful of smoked gouda and a dash of pepper jack for extra depth. The smoky and spicy notes mingle, creating a cheese profile that satisfies the most demanding palates.
Low‑Calorie Lightness
Use low‑fat cream cheese and reduced‑fat cheddar, and skip the bacon. The dish still delivers that creamy, cheesy experience while keeping the calorie count down.
Vegan Version
Replace the chicken with sautéed tempeh, use a plant‑based cheese blend, and cook the bacon with a vegan alternative. The flavors remain bold, and the dish stays hearty enough for a plant‑based crowd.
Breakfast Bonanza
Fold in scrambled eggs and serve the rolls alongside a fresh fruit salad. This twist turns the dish into a filling breakfast that will keep you energized through the morning.
Storing and Bringing It Back to Life
Fridge Storage
Store the assembled rolls (but not baked) in an airtight container in the refrigerator for up to 2 days. When ready to serve, reheat in the oven at 350°F for 10 minutes, or until heated through.
Freezer Friendly
Wrap each roll tightly in plastic wrap and place in a freezer bag. Freeze for up to 3 months. Thaw overnight in the refrigerator before baking at 375°F for 20 minutes.
Best Reheating Method
Add a splash of milk to the sauce before reheating; this restores moisture and ensures the cheese stays silky. Reheat in the oven or microwave, covering with foil to prevent drying out.