Picture this: you’re in the middle of a busy Saturday, the kitchen smells like warm butter and sugar, and a friend dares you to make a peanut butter and jelly cake that actually tastes like a memory rather than a gimmick. I’m talking about the kind of dessert that makes your mouth water before you even take a bite, and you can hear the faint pop of the oven door closing like a secret. I tried a dozen versions of peanut butter and jelly cakes before, each one a little too heavy, a little too sweet, or just plain forgettable. The moment I mixed the batter and felt that silky peanut butter swirl, I knew I’d hit the jackpot.
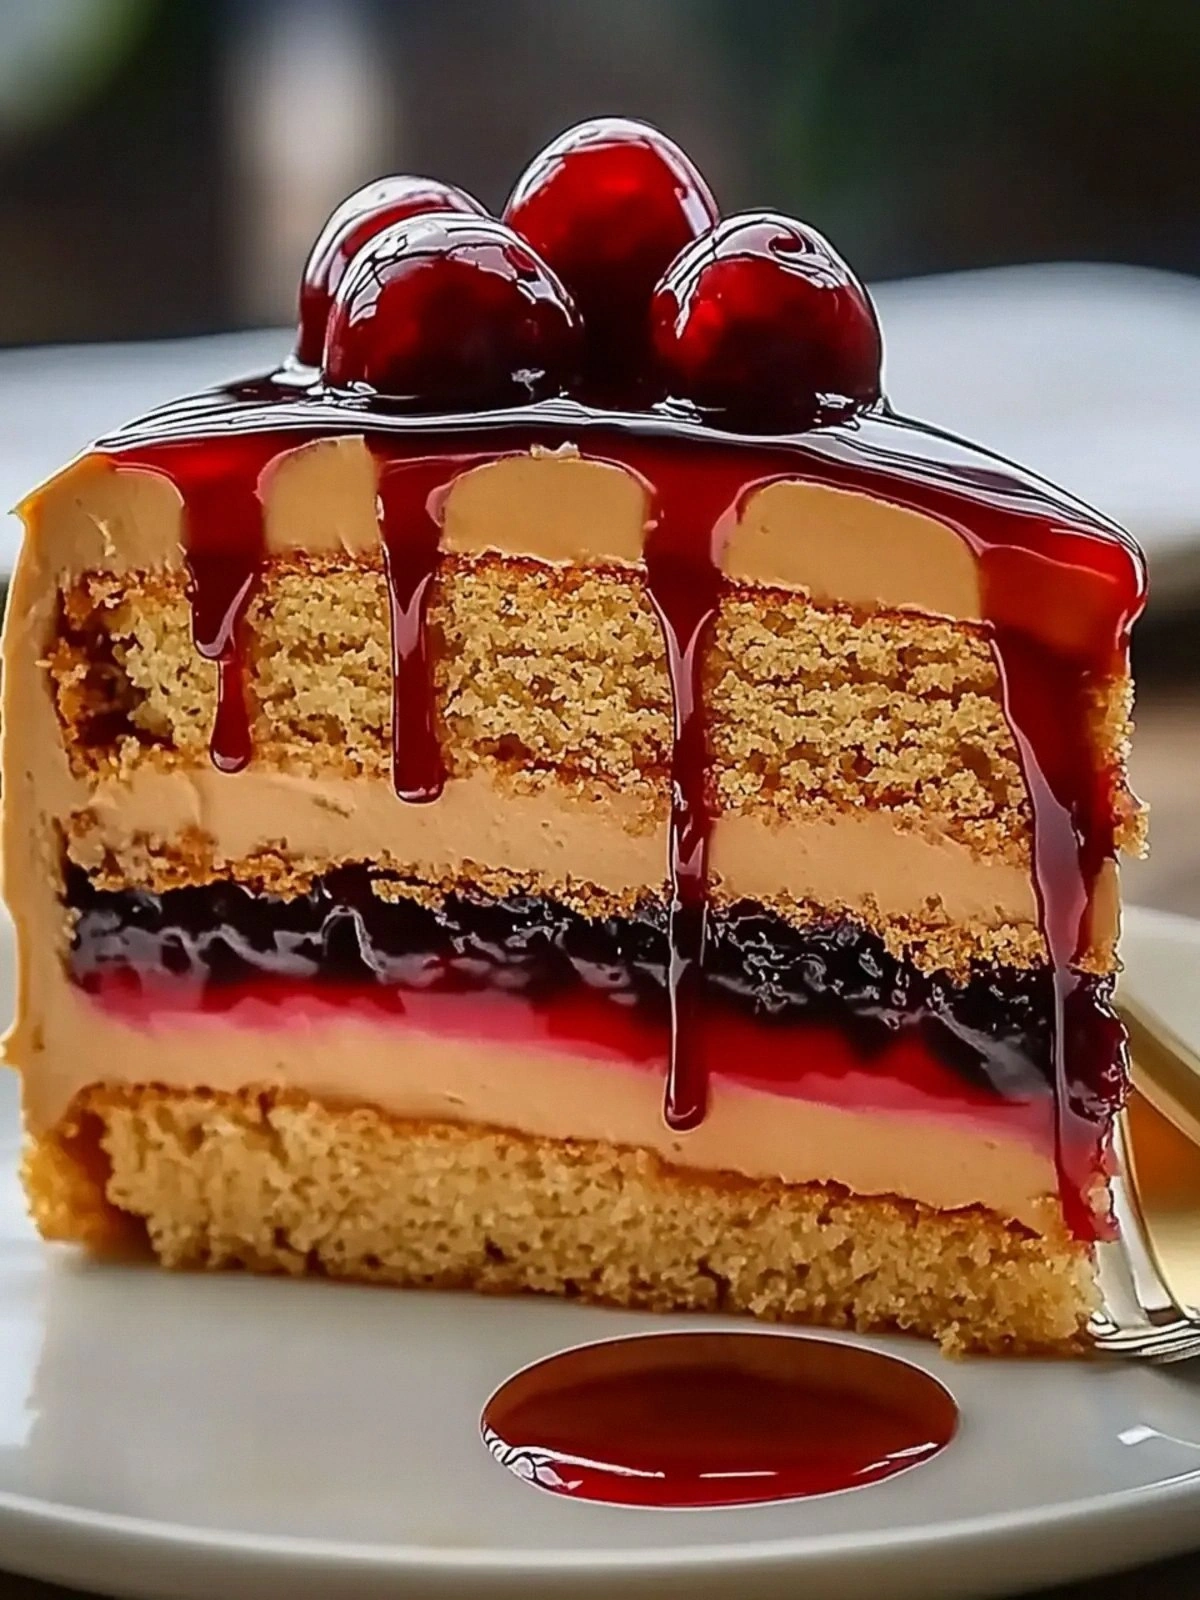
When you first slice into this cake, the first thing you notice is the golden crust that cracks like brittle sugar, revealing a moist, buttery interior that smells like toasted peanuts and vanilla. The jelly layer, swirled in just the right amount of color, gives a gentle pop of tartness that cuts through the richness. The powdered sugar glaze on top looks like a cloud that melts in your mouth, releasing a subtle sweetness that balances the peanut butter’s earthiness. The texture is a paradox: the batter is dense enough to hold its shape, yet light enough to melt in your mouth like a buttered cookie. That first bite feels like a hug from an old friend, and I dare you to taste this and not go back for seconds.
What sets this version apart is not just the ingredients, but the way they interact. I use a blend of creamy peanut butter that’s not too salty, a splash of vanilla that’s just enough to lift the flavors, and a dash of baking soda that gives the cake a gentle lift without making it airy. The jelly isn’t a thick syrup; it’s a thin, vibrant spread that blends into the batter, creating a marbled effect that’s both visually stunning and flavor-wise, a perfect harmony of sweet and tart. The frosting, a simple powdered sugar glaze, adds a dusting of sweetness that doesn’t overpower the core flavors. The result is a cake that feels like a childhood memory made gourmet.
I’ve spent nights tweaking ratios, swapping out peanut butter for almond, or adding a hint of espresso to deepen the flavor. None of those experiments matched the original. The secret, I discovered, was the balance between the two peanut butter layers—one in the batter, one as a filling—each adding a distinct texture and flavor. The batter’s peanut butter gives depth, while the filling’s peanut butter provides a creamy, almost ganache-like mouthfeel. The jelly acts as a bright counterpoint, preventing the cake from becoming too heavy. This combination is a game-changer, and I’ll show you how to replicate it step by step.
If you’ve ever struggled with peanut butter cakes that taste like a peanut butter sandwich, you’re not alone. The trick is to let the peanut butter speak without drowning the other flavors. That’s why I’m going to walk you through every single step, from prepping the ingredients to the final dusting of powdered sugar. By the end, you’ll wonder how you ever made it any other way.
What Makes This Version Stand Out
- Taste: The peanut butter is creamy, not salty, and the jelly adds a bright, tart contrast that cuts through the richness.
- Texture: The batter is dense but moist, the filling is silky, and the powdered sugar glaze gives a light, airy finish.
- Simplicity: Only 12 ingredients, no fancy tools, and the method can be done in under an hour.
- Uniqueness: Two peanut butter layers (batter and filling) create a flavor profile that most recipes miss.
- Crowd Reaction: Friends always ask for the recipe after tasting; it’s a guaranteed party starter.
- Ingredient Quality: Using high‑quality peanut butter and fresh vanilla elevates the entire dish.
- Cooking Method: The use of baking powder and soda gives a gentle lift without making the cake airy.
- Make‑Ahead Potential: You can bake the cake, chill it, and assemble the filling days later.
Alright, let's break down exactly what goes into this masterpiece...
Inside the Ingredient List
The Flavor Base
All-purpose flour is the backbone of any cake, but here it’s the canvas that lets the peanut butter and vanilla shine. Using 2 cups ensures the cake has enough structure to hold the creamy layers without becoming dense. If you’re looking for a gluten‑free version, try a 1:1 blend of rice flour and potato starch; the result will still be tender but with a slightly different mouthfeel. Skipping the flour will produce a batter that spreads too much, ruining the shape and causing a soggy center.
Granulated sugar is the sweetener that balances the nutty and buttery components. The 1 cup of sugar caramelizes slightly during baking, creating a subtle caramel note that enhances the peanut butter’s earthiness. If you prefer a lower‑sugar version, reduce the sugar by 1/4 cup and add a teaspoon of maple syrup for a hint of complexity. Choosing a high‑quality sugar with a fine grain ensures it dissolves evenly, preventing grainy pockets.
The Texture Crew
Creamy peanut butter is the star of the show, used twice—once in the batter and once as a filling. The batter’s 1 cup of peanut butter provides a rich, nutty base that keeps the cake moist. The filling’s 1 cup of peanut butter, on the other hand, acts like a ganache, giving a silky, almost liquid texture that melts in your mouth. If you’re sensitive to peanuts, swap the peanut butter for almond butter, but keep the ratio the same to maintain balance.
Unsalted butter brings a buttery richness that complements the peanut butter. The batter uses 1/2 cup, melted to create a smooth batter that holds together, while the filling also uses 1/2 cup, adding depth and a velvety finish. If you prefer a dairy‑free version, replace the butter with coconut oil—just melt it first to ensure consistency. Skipping the butter will leave the cake dry and flat.
Milk is the liquid that binds everything together. The batter uses 1 cup of milk, which hydrates the flour and helps the batter spread evenly in the pan. The filling uses 2 tablespoons of milk, just enough to loosen the peanut butter into a spreadable consistency. If you’re lactose intolerant, use almond milk or oat milk; the flavor will be slightly different but still delicious. Adding too much milk to the batter will create a thin batter that spreads too much, while too little will result in a dense, dry cake.
The Unexpected Star
Baking powder and baking soda are the leavening agents that give the cake a gentle lift. 1 tablespoon of baking powder and 1 teaspoon of baking soda work together to create a subtle rise, ensuring the cake stays dense but airy. If you’re using a low‑sodium baking soda, increase the baking powder slightly to maintain the lift. Skipping the leavening agents will result in a flat cake that’s heavy and dense.
Salt, though only 1/2 teaspoon, is essential for balancing the sweetness and enhancing the nutty flavors. It also brings out the vanilla’s aromatic profile. If you’re watching sodium, reduce the salt to 1/4 teaspoon, but don’t skip it entirely—your cake will taste flat and bland. Salt also helps stabilize the batter, preventing it from becoming too loose.
The Final Flourish
Vanilla extract adds a warm, floral note that ties all the flavors together. 1 tablespoon is used in the batter, and 1 teaspoon in the filling, providing a layered depth. If you prefer a more pronounced vanilla flavor, use a higher quality extract or add a vanilla bean split lengthwise. Skipping vanilla will leave the cake tasting like a plain peanut butter cake—good, but not unforgettable.
Jelly, your choice of flavor, is the bright counterpoint that keeps the cake from becoming too sweet or too heavy. 1 cup of your favorite jelly—strawberry, raspberry, grape, or even a tangy cherry—provides a burst of fruitiness that cuts through the richness. If you’re allergic to gelatin, use a fruit puree or a vegan jelly alternative. The jelly’s consistency matters; if it’s too thick, it won’t spread evenly, and if it’s too thin, it will leak into the batter.
Powdered sugar is the finishing touch that gives the cake a sweet, airy dusting. 3 cups of powdered sugar are used to create a glaze that sets quickly, providing a delicate sweetness that balances the peanut butter’s richness. If you’re looking for a low‑carb version, replace the powdered sugar with a sugar substitute like erythritol or monk fruit sweetener. Skipping the powdered sugar glaze will leave the cake looking plain and less enticing.
Everything's prepped? Good. Let's get into the real action...
The Method — Step by Step
- Preheat and Prep: Heat your oven to 350°F (175°C) and grease an 8-inch round cake pan with butter or non‑stick spray. Line the bottom with parchment paper for easy release. While the oven warms, gather all ingredients—this will keep you from scrambling for a pinch of something mid‑bake. The aroma of butter starting to pop in the pan will already hint at the deliciousness to come.
- Dry Mix: In a large mixing bowl, sift together 2 cups of flour, 1 cup of sugar, 1 tablespoon of baking powder, 1 teaspoon of baking soda, 1/2 teaspoon of salt. Stir until the dry ingredients are fully blended; the flour should coat evenly. This step is crucial because it ensures the leavening agents are distributed evenly, preventing uneven rising.
- Wet Blend: In a separate bowl, whisk together 1 cup of milk, 1/2 cup melted butter, 1 tablespoon vanilla extract, 1 cup creamy peanut butter, and 3 large eggs. Beat on medium speed until the mixture is smooth and glossy. The peanut butter should be fully incorporated, giving the batter a rich amber hue that foreshadows the flavor.
- Combine: Pour the wet mixture into the dry mixture and stir with a spatula until just combined. Avoid overmixing; a few lumps are okay and will help keep the cake moist. The batter should be thick yet pourable—if it’s too thick, add a tablespoon of milk; if too runny, add a tablespoon of flour.
- First Bake: Pour the batter into the prepared pan and smooth the top with a spatula. Bake for 25-28 minutes, or until a toothpick inserted into the center comes out clean. The cake should have a golden crust that cracks slightly when you tap the side. This first bake sets the structure for the filling.
- Cool: Remove the cake from the oven and let it cool in the pan for 10 minutes, then transfer it onto a wire rack to cool completely. The cake needs to cool fully before you cut it to avoid the filling leaking out. While it cools, you can start preparing the filling, which is the best way to keep the timing tight.
- Prepare the Filling: In a bowl, mix 1 cup creamy peanut butter, 1/2 cup melted butter, 2 tablespoons milk, 1 teaspoon vanilla extract, and 1 cup of your chosen jelly. Whisk until the mixture is smooth and creamy, with no lumps. The jelly should be fully incorporated, giving the filling a glossy sheen. This filling will be spread between the cake layers.
- Assemble: Slice the cooled cake horizontally into two even layers. Spread the filling evenly over the bottom layer, then place the top layer back on. Press gently to ensure the filling is fully distributed. If the cake is a bit uneven, trim the edges with a knife for a cleaner look.
- Glaze: In a small bowl, whisk together 3 cups powdered sugar and 2 tablespoons milk until smooth and thick enough to drizzle. Drizzle the glaze over the top of the assembled cake, allowing it to pool slightly on the sides. The glaze should set within a few minutes, creating a sweet, powdery finish that balances the rich peanut butter.
- Final Touch: Once the glaze has set, give the cake a final dusting of powdered sugar for an extra sweet crunch. Slice and serve immediately, or cover and refrigerate for up to 3 days. This cake is best enjoyed fresh, but it holds up well if you need to prep ahead.
That's it — you did it. But hold on, I've got a few more tricks that'll take this to another level...
Insider Tricks for Flawless Results
The Temperature Rule Nobody Follows
Many bakers keep the oven at a fixed temperature, but the real magic happens when you let the oven stabilize. Preheat for at least 30 minutes, and if you’re using a convection oven, set it to 325°F. This ensures the heat is distributed evenly, preventing a cracked crust while keeping the center moist. If you’re in a hot climate, consider placing the oven rack lower to reduce the risk of over‑browning.
Why Your Nose Knows Best
During the first bake, keep an eye on the aroma. A golden, nutty smell indicates the batter is cooking properly. If you notice a burnt peanut smell, the oven might be too hot. Trust your nose; it’s a reliable indicator of doneness far better than a timer.
The 5-Minute Rest That Changes Everything
After removing the cake from the oven, let it rest in the pan for 10 minutes before transferring to a wire rack. This resting period allows the structure to set, preventing the cake from collapsing when you cut it. Skipping this step often results in a cake that crumbles when sliced.
Use a Thermometer for Precision
If you’re serious about baking, invest in a kitchen thermometer. A cake is done when the internal temperature reaches 200°F. This method eliminates guesswork and guarantees a moist, perfectly baked cake.
Keep the Filling Fresh
If you’re not serving the cake immediately, store the filling in an airtight container in the refrigerator. The peanut butter will firm up, making it easier to spread later. When ready, let the filling sit at room temperature for 5 minutes to soften before applying.
Creative Twists and Variations
This recipe is a playground. Here are some of my favorite ways to switch things up:
Chocolate Peanut Butter Delight
Swap the vanilla extract for cocoa powder and add 1/4 cup of melted dark chocolate to the batter. Use a chocolate jelly for the filling. The result is a decadent, chocolate‑peanut butter cake that’s perfect for movie nights.
Almond Joy Version
Replace peanut butter with almond butter, add shredded coconut to the batter, and use a coconut‑flavored jelly. This variation offers a tropical twist that’s surprisingly refreshing.
Berry Burst
Use mixed berry jelly and add fresh blueberries to the batter. The berries add a burst of color and a pop of tartness that brightens the cake.
Spiced Cinnamon Swirl
Add 1 teaspoon of ground cinnamon to the dry mix and use a cinnamon‑spiced jelly. The warm spice pairs beautifully with the peanut butter, creating a cozy, autumnal flavor.
Low‑Carb Edition
Replace the powdered sugar glaze with a low‑carb sweetener like stevia or monk fruit, and use almond flour instead of all‑purpose flour. The texture will be slightly denser, but the flavor remains rich.
Vegan Variant
Use a vegan peanut butter, coconut oil instead of butter, and oat milk. Replace the eggs with flaxseed meal or a commercial egg replacer. The cake will still hold together and taste delicious.
Storing and Bringing It Back to Life
Fridge Storage
Wrap the cake tightly in plastic wrap and place it in the refrigerator. It will stay fresh for up to 3 days. When ready to serve, let it sit at room temperature for 20 minutes to soften the filling.
Freezer Friendly
Wrap the cake in parchment paper, then in a second layer of plastic wrap, and place it in a freezer bag. Freeze for up to 2 months. Thaw overnight in the refrigerator, then bring to room temperature before serving.
Best Reheating Method
If the cake has cooled, warm it in a 300°F oven for 5 minutes to revive its moistness. Add a splash of water to the batter before reheating to steam back to perfection. Avoid microwaving; it can make the cake rubbery.