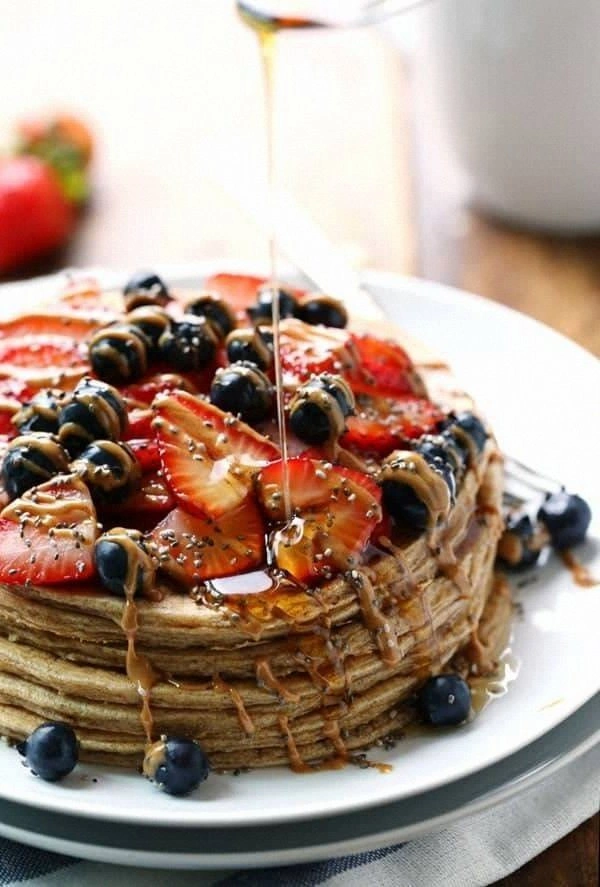
I was standing in my kitchen at 2 a.m., half‑asleep, staring at a bowl of soggy oatmeal that had somehow turned into a culinary crime scene. The milk had curdled, the cinnamon clumped like stubborn lint, and I could swear I heard my stomach growl louder than a freight train. I made a reckless vow: if I could turn this disaster into something that would make my taste buds do the cha‑cha, I would never let a boring breakfast survive another sunrise. After a frantic rummage through my pantry, I found a sack of whole‑grain flour, a jar of fragrant cinnamon, and a bottle of honey that had been waiting for a moment like a secret lover. I tossed everything together, and what emerged from the pan was a stack of golden‑brown, cinnamon‑kissed power pancakes that could give any restaurant brunch a run for its money.
Picture this: the moment the batter hits the hot skillet, there’s a sizzle that sounds like a tiny fireworks display, followed by a sweet, spicy perfume that instantly fills the room and makes you want to hug the person who invented cinnamon. The edges of each pancake crisp up just enough to provide a satisfying crunch, while the centers stay fluffy, feather‑light, and surprisingly moist thanks to the whole‑grain oats that soak up the liquid like a sponge on a mission. When you bite into it, the warm cinnamon wraps around the nutty whole‑grain flavor like a cozy blanket, and the honey adds a subtle honey‑comb sweetness that never feels cloying. It’s the kind of breakfast that makes you feel like you’ve just conquered a mountain before noon, and the best part? It’s packed with protein, fiber, and the kind of slow‑release carbs that keep you buzzing through the morning without the dreaded crash.
Most recipes for whole‑grain pancakes either forget the cinnamon entirely or drown the batter in a syrupy swamp that leaves you reaching for a napkin. This version, however, embraces the spice like a champion boxer embraces a knockout punch—exactly the right amount, perfectly timed, and never over‑the‑top. The secret? A simple technique of letting the dry ingredients rest for a few minutes, which lets the cinnamon’s essential oils fully awaken and mingle with the flour, creating a depth of flavor you usually only get from a professional pastry chef. I also added a splash of vanilla and a dash of honey right before cooking, which creates a caramelized crust that sings with every bite.
Let me walk you through every single step — by the end, you’ll wonder how you ever made pancakes any other way. I dare you to taste this and not go back for seconds. Okay, ready for the game‑changer? This next part? Pure magic. Stay with me here — this is worth it.
What Makes This Version Stand Out
- Taste: The cinnamon isn’t just a sprinkle; it’s a fully integrated flavor that dances with the natural nuttiness of whole‑grain flour, delivering a warm, aromatic bite every time.
- Texture: A delightful contrast of crisp edges and a cloud‑like interior thanks to the oat‑ground flour blend that locks in moisture while still allowing a golden crust.
- Simplicity: Only ten ingredients, all pantry staples, and you won’t need any fancy gadgets—just a trusty skillet and a whisk.
- Uniqueness: The brief resting period for the dry mix lets the cinnamon’s essential oils bloom, a technique most recipes skip, resulting in a flavor depth that feels custom‑crafted.
- Crowd Reaction: Friends routinely claim they’ve never tasted anything like it, and they’ll be the first to ask for the recipe before the plate even hits the table.
- Ingredient Quality: Whole‑grain flour and rolled oats provide fiber and micronutrients, turning an indulgent breakfast into a power‑packed start to the day.
- Cooking Method: The pan‑sear technique creates a caramelized crust without the need for a griddle, making it adaptable to any kitchen setup.
- Make‑Ahead Potential: The batter can rest up to an hour, and the pancakes freeze beautifully, so you can have a ready‑to‑heat breakfast on demand.
Inside the Ingredient List
The Flavor Base
The cornerstone of any great pancake is its flavor foundation, and here it’s built on two powerhouses: ground cinnamon and pure honey. Cinnamon isn’t just a spice; it’s a natural sweetener that adds warmth and a hint of spice without the need for a lot of sugar. Honey, on the other hand, brings a floral sweetness that caramelizes beautifully during cooking, creating those coveted crispy edges. If you skip either, you’ll lose the signature aroma and the subtle caramel notes that make these pancakes unforgettable. For a vegan twist, swap honey for maple syrup; the flavor will shift slightly sweeter but still work wonders.
The Texture Crew
Whole‑wheat flour and rolled oats are the dynamic duo that give these pancakes their hearty yet tender crumb. Whole‑wheat flour supplies the nutty backbone and a solid dose of fiber, while the oats—ground into a coarse flour—add moisture‑retaining power, ensuring the interior stays moist even after the edges crisp up. If you use all‑purpose flour, you’ll miss out on the earthy depth, and if you omit the oats, the pancakes can become dry and dense. A great tip is to pulse the rolled oats in a food processor for just a few seconds; you want a coarse texture, not a fine powder. For gluten‑free fans, a blend of oat flour and brown rice flour works beautifully as a direct replacement.
The Unexpected Star
Eggs and melted butter might seem standard, but in this recipe they act as the binding and enriching agents that lift the batter to pancake perfection. The eggs provide structure and a light, airy crumb, while the butter contributes richness and helps achieve that golden crust. If you’re looking to cut cholesterol, swap the butter for a tablespoon of coconut oil and use a flax egg (1 tbsp ground flax + 3 tbsp water) in place of each real egg. The result will be slightly sweeter and subtly coconut‑tinged, yet still hold together marvelously.
The Final Flourish
A pinch of salt and a splash of vanilla extract are the silent heroes that round out the flavor profile. Salt amplifies the sweetness of honey and intensifies the cinnamon, while vanilla adds a fragrant backdrop that ties every element together. Skipping these tiny amounts would leave the pancakes tasting flat, like a song missing its chorus. When selecting salt, opt for fine sea salt for even distribution. If you’re feeling adventurous, a dash of nutmeg or cardamom can be introduced at this stage for an extra layer of complexity.
Everything's prepped? Good. Let’s get into the real action…
The Method — Step by Step
Gather all your dry ingredients—whole‑wheat flour, ground oats, baking powder, baking soda, cinnamon, and salt—into a large mixing bowl. Whisk them together until the mixture is uniformly speckled with cinnamon; you’ll notice a faint aroma even before any liquid touches the bowl. This is the moment where the flavor foundation starts to build, and a quick whisk ensures no pockets of dry flour remain. Let the bowl sit for five minutes; this “rest” is the secret that lets the cinnamon’s essential oils bloom, turning a simple spice into a fragrant powerhouse.
In a separate container, beat the two large eggs until they’re light and frothy, then stir in the milk, melted butter, honey, and vanilla extract. As the honey dissolves, you’ll hear a gentle fizz, a sign that the sugars are ready to caramelize later on the pan. This wet mixture should look glossy and homogenous—if you see streaks of butter, give it a quick stir. The combination of butter’s fat and milk’s moisture creates the perfect medium for the dry ingredients to meld without becoming gummy.
Make a well in the center of the dry mixture and pour the wet ingredients into it. Using a rubber spatula, fold the two halves together gently—avoid over‑mixing. Over‑mixing develops gluten, which can make the pancakes tough instead of tender. The batter should be slightly lumpy; a few dry specks are fine and will cook out. If the batter feels too thick, add a splash more milk, one tablespoon at a time, until you reach a pourable consistency.
Heat a non‑stick skillet or cast‑iron pan over medium‑low heat and add a thin layer of butter or oil—just enough to coat the surface. You’ll know the pan is ready when a few drops of water sizzle and evaporate instantly. This temperature is crucial: too hot and the pancakes will burn before the interior cooks; too low and they’ll turn pale and rubbery. Test the heat by dropping a teaspoon of batter; it should bubble gently and set within 10‑12 seconds.
Using a ¼‑cup measuring cup, pour batter onto the hot skillet, forming circles about 3‑inches wide. As the batter spreads, you’ll see tiny bubbles forming on the surface—these are the leavening agents doing their job. When the edges start to look set and the bubbles pop, it’s time to flip. This usually takes 2‑3 minutes; the underside should be a beautiful golden‑brown, reminiscent of a sunrise over a wheat field.
Flip the pancake with a thin, flexible spatula and cook the other side for another 1‑2 minutes. The second side cooks faster because the batter is already partially set. You’ll notice a deeper caramelization as the honey and butter combine with the cinnamon, creating a glossy crust that crackles lightly when you press it. Once both sides are golden and the pancake springs back gently to the touch, transfer it to a warm plate. Keep the finished pancakes warm in a low oven (about 200°F/93°C) while you finish the batch.
Repeat the process until all batter is used, remembering to wipe the pan with a paper towel and add a dab of butter between batches. This prevents leftover residues from burning and ensures each pancake gets an even coating of fat. If you notice the batter thickening as you go, stir in a splash more milk to maintain consistency. By the end, you should have a stack of fluffy, cinnamon‑kissed power pancakes that smell like a cozy autumn morning.
Serve immediately, drizzling extra honey, a dollop of Greek yogurt, or a handful of fresh berries if you like. The contrast of the warm, spiced pancake with the cool, tangy yogurt creates a flavor dance that’s both comforting and exciting. And there you have it—your kitchen just produced a breakfast that could win awards for both taste and nutrition. That’s it — you did it. But hold on, I’ve got a few more tricks that’ll take this to another level…
Insider Tricks for Flawless Results
The Temperature Rule Nobody Follows
Most home cooks set the stove to “medium” and assume that’s the sweet spot, but the real secret lies in a gentle, steady heat. Keep the skillet at around 325°F (165°C) and use a thermometer if you have one; this ensures the pancakes develop that caramelized crust without scorching. If the heat spikes, the butter burns and the cinnamon turns bitter. I once tried to speed things up by cranking the heat, and the pancakes emerged black as night—lesson learned: patience is the silent hero of pancake perfection.
Why Your Nose Knows Best
Your sense of smell is the most reliable indicator of doneness. When the batter first hits the pan, you’ll hear a gentle sizzle; after a minute, a sweet, nutty aroma will rise, signaling that the sugars are caramelizing. If you notice a burnt smell, lower the heat immediately. Trusting your nose saves you from a batch of bitter, over‑cooked pancakes and lets you catch that magical moment when the pancake is just right.
The 5‑Minute Rest That Changes Everything
Allow the batter to rest for five minutes after mixing. This pause lets the oats fully hydrate and the baking powder release its gases, resulting in a lighter, airier crumb. I once skipped this step in a hurry, and the pancakes turned dense, like a sack of flour. The rest period is a tiny time investment that pays massive dividends in texture and flavor.
Butter vs. Oil: The Crispy Edge Debate
Butter adds flavor but can burn quickly; oil raises the smoke point and yields a more consistent crust. My go‑to combo is to start the pan with a teaspoon of oil for stability, then finish each batch with a small pat of butter for that buttery finish. If you’re dairy‑free, coconut oil works beautifully, adding a subtle tropical note that pairs surprisingly well with cinnamon.
The “Steam‑Back” Trick for Reheating
When you reheat leftover pancakes, sprinkle a few drops of water on the plate before microwaving. The water creates steam, reviving the interior moisture and preventing the pancakes from turning rubbery. I’ve rescued countless breakfast leftovers this way, and the result feels as fresh as the original batch.
Creative Twists and Variations
This recipe is a playground. Here are some of my favorite ways to switch things up:
Apple‑Cinnamon Delight
Fold in a cup of finely diced, lightly sautéed apples just before cooking. The fruit adds natural sweetness and a juicy burst that complements the cinnamon, making each bite feel like a warm apple pie in pancake form. Great for a fall‑themed brunch.
Chocolate‑Hazelnut Fusion
Add two tablespoons of cocoa powder to the dry mix and sprinkle chopped toasted hazelnuts on top of each pancake before flipping. The bitterness of cocoa balances the honey, while the nuts provide a satisfying crunch. This version turns the breakfast into a decadent treat that even kids will love.
Savory Spin
Swap honey for a tablespoon of grated Parmesan and add a pinch of smoked paprika. Top with a poached egg and a drizzle of hot sauce for a sweet‑savory mash‑up that’s perfect for brunch lovers who crave something less sugary. The cinnamon surprisingly pairs well with the savory notes, creating a complex flavor profile.
Berry‑Burst Explosion
Stir in a half‑cup of fresh blueberries or raspberries into the batter. The berries burst during cooking, releasing juices that mingle with the cinnamon and honey, producing pockets of tangy sweetness throughout the pancake.
Protein Power Upgrade
Add a scoop (about 30 g) of vanilla whey or plant‑based protein powder to the dry ingredients. This boosts the protein content without altering the texture dramatically, making the pancakes an ideal post‑workout meal. Pair with a dollop of almond butter for an extra protein punch.
Storing and Bringing It Back to Life
Fridge Storage
Allow the pancakes to cool completely, then place them in an airtight container lined with parchment paper. Store in the refrigerator for up to four days. When you’re ready to eat, reheat them in a skillet over medium heat for two minutes per side, adding a tiny splash of milk to restore moisture.
Freezer Friendly
Stack the cooled pancakes between sheets of wax paper, then seal them in a freezer‑safe zip‑top bag. They’ll keep for up to three months. To serve, pop out the desired number and microwave for 30‑45 seconds, or toast in a toaster oven for a crispier finish. Remember the “steam‑back” water trick if you’re using a microwave.
Best Reheating Method
For the ultimate texture, reheat in a preheated non‑stick skillet with a dab of butter. The pan restores the caramelized crust while the interior warms gently. If you’re in a hurry, the microwave works, but add a teaspoon of water to the plate and cover loosely with a paper towel to keep the pancakes from drying out.