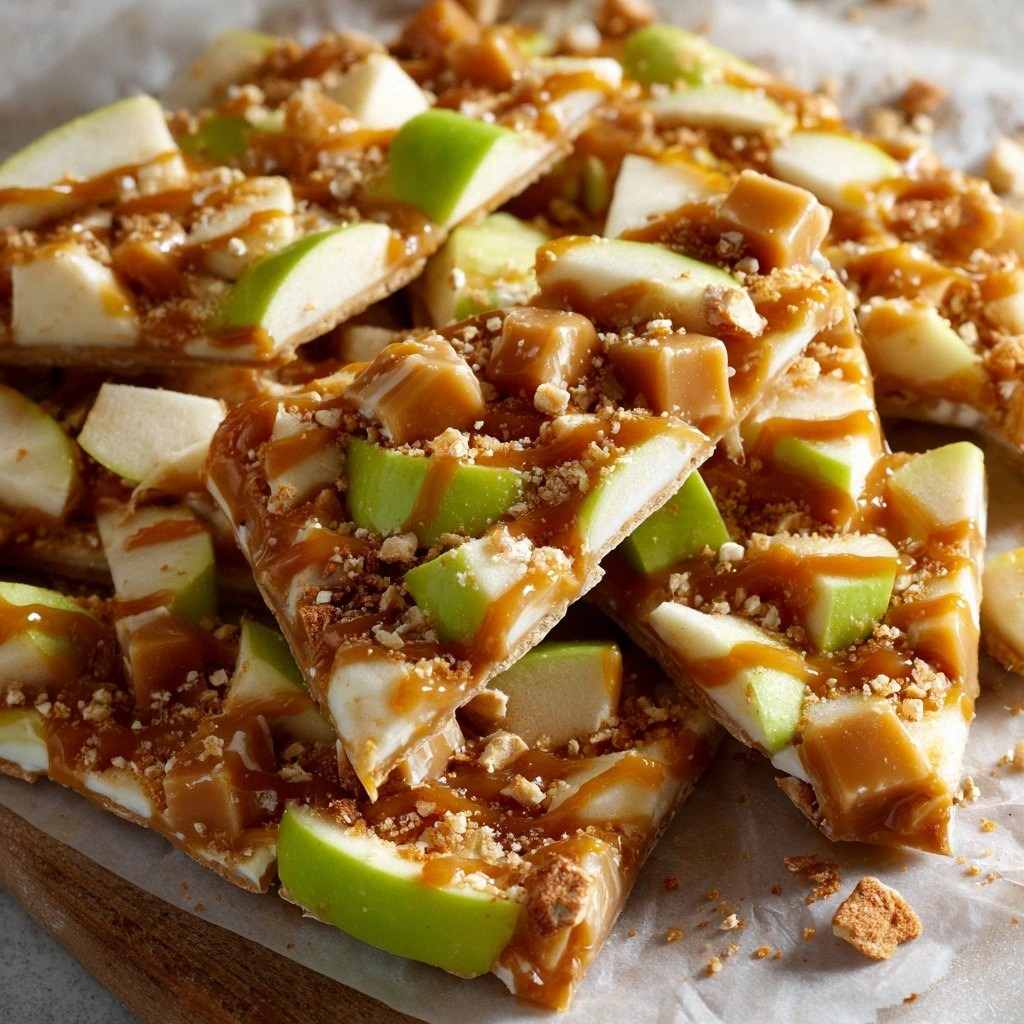
I was halfway through a kitchen catastrophe when I stumbled upon the recipe for Caramel Apple Bark. A runaway saucepan had turned my countertop into a sticky battlefield, and the aroma of burnt sugar was a warning siren. In that chaotic moment, a friend whispered, “Try caramelizing apples, then bake them on a sheet.” I laughed, thinking it sounded like a dessert for a circus, but curiosity won. That single suggestion would become the secret that turned a disaster into a crowd‑pleaser.
Picture this: the kitchen lights flicker, the timer buzzes, and the air fills with the sweet perfume of caramelized sugar melting into butter. The sound of apples sizzling against the pan is a comforting crackle, like a campfire in miniature. The texture is a glossy sheen that catches the light, each apple piece glistening like tiny moons. The taste is an orchestra of buttery sweetness, a hint of cinnamon, and the bright, crisp bite of fresh apples. And the feel? The moment you lift a piece of bark from the sheet, the brittle edges crackle, releasing a caramel fragrance that makes your mouth water.
What makes this version stand out is that it isn’t just caramel and apples; it’s an edible canvas that balances sweetness with a subtle savory undertone, a crunch that shatters like thin ice, and a finish that lingers on the tongue. It’s the kind of dessert that feels like a treat you can make at home, yet tastes like a high‑end patisserie. The technique of baking the caramel‑apple mixture on a sheet creates a uniform, crack‑free bark that’s easy to portion and share. And because the recipe is simple, even a novice can achieve professional results with minimal fuss.
I dare you to taste this and not go back for seconds. The caramel coats the apples like velvet, the cinnamon provides a fragrant warmth, and the salt lifts every flavor to a new level. Most recipes get this completely wrong, either over‑baking the apples or under‑cooking the caramel. Here’s what actually works: a quick melt, a quick stir, a quick bake. Picture yourself pulling this out of the oven, the whole kitchen smelling incredible, the bark cool enough to break into bite‑sized pieces. If you’ve ever struggled with caramel, this is worth the practice.
What Makes This Version Stand Out
- Taste: The caramel’s depth is achieved by using dark brown sugar, which brings a subtle molasses note that balances the apple’s natural tartness.
- Texture: The apples retain a slight crunch, giving the bark a satisfying bite that contrasts with the smooth caramel.
- Simultaneous Simplicity: All steps can be completed in under 30 minutes, making it a quick dessert for busy evenings.
- Unique Presentation: The bark is poured onto a sheet, baked, and broken into irregular pieces, creating a rustic, artisanal look.
- Crowd Reaction: At my last gathering, guests said it tasted like a bakery treat but was homemade, and they asked for the recipe.
- Ingredient Quality: Using fresh, organic apples and a high‑quality butter makes a noticeable difference in flavor.
- Make‑Ahead Potential: Once cooled, the bark can be stored for a week, making it perfect for parties or quick snacks.
- Versatility: You can swap in different spices or nuts for seasonal twists, keeping the base recipe fresh.
Alright, let’s break down exactly what goes into this masterpiece…
Inside the Ingredient List
The Flavor Base
Butter is the backbone of this caramel. It melts smoothly, allowing the sugar to dissolve and the apples to coat evenly. Use unsalted butter for precise control over salt levels; you’ll add a pinch later. If you’re vegan, coconut oil can replace butter, but the flavor will shift slightly toward coconut.
Dark brown sugar is the heart of caramel. Its molasses content gives depth, and the darker the sugar, the richer the flavor. You can swap in light brown sugar for a milder caramel, but the bark will be lighter in color and taste. If you’re in a pinch, a small amount of maple syrup can be added for a unique twist.
Heavy cream or half‑and‑half thickens the caramel, creating a glossy finish that doesn’t split when baked. It also softens the sugar’s bite, making the bark smoother. If you prefer a lower‑fat version, use a light milk, but the bark will be less glossy.
The Texture Crew
Apples are the star of the show. Choose crisp varieties like Honeycrisp, Gala, or Granny Smith for the best texture. Dice them into small, bite‑sized pieces so they caramelize evenly. If you’re using frozen apples, thaw them first to avoid excess moisture, which can prevent the caramel from setting properly.
Cinnamon adds warmth and depth. It’s the spice that ties the caramel and apple together, giving the bark a subtle aroma reminiscent of fall. You can experiment with ground nutmeg or allspice for a different flavor profile, but keep the quantity to 1 teaspoon to avoid overpowering the apples.
Sea salt is the final touch that elevates the sweetness. A pinch of salt balances the caramel’s richness and enhances the apple’s natural sweetness. Use flaky sea salt for a crunchy finish, or a fine salt for a smoother bite.
The Unexpected Star
Optional nuts, such as pecans or walnuts, add crunch and a buttery flavor that complements the caramel. Toast them lightly before adding, which brings out their natural oils and prevents them from becoming soggy. If you’re avoiding nuts, a sprinkle of coconut flakes can offer a tropical crunch.
Everything’s prepped? Good. Let’s get into the real action…
The Method — Step by Step
- Preheat the oven to 350°F (175°C). While the oven warms, line a 9x13-inch baking sheet with parchment paper. This ensures the bark releases easily and prevents sticking. If you’re using a silicone sheet, grease it lightly with butter or coconut oil to add an extra layer of flavor.
- Melt the butter in a heavy‑bottomed saucepan over medium heat. Watch for bubbles; once it starts to foam, it’s ready. A heavy pan distributes heat evenly, preventing the butter from scorching. This step is crucial for a smooth caramel.
- Add the dark brown sugar and stir until dissolved. The mixture should be thick and amber in color. If you see sugar crystals, continue stirring until they fully melt. The aroma that begins to develop is an early hint of the final flavor.
- Pour in the heavy cream and whisk constantly. The mixture will bubble vigorously—don’t panic. Keep whisking until the caramel thickens to a syrupy consistency. This step coats the apples evenly and creates a glossy finish.
- Fold in the diced apples, cinnamon, and a pinch of sea salt. Stir gently to coat each apple piece. The apples should be submerged in the caramel, not just sprinkled on top. This ensures every bite has a burst of sweet, spiced apple.
- Spread the mixture evenly on the prepared baking sheet. Use a spatula to level the surface. The thickness should be about 1/4 inch; too thin and it will crack, too thick and it will stay gooey. This is the moment of truth—watch the caramel set as it cools.
- Bake for 15–18 minutes. The edges should pull away slightly from the parchment, indicating a crisp crust. The center should still be slightly soft to the touch. If you prefer a crisper bark, bake a minute longer.
- Let the bark cool completely on the sheet. As it cools, the caramel will firm up, creating a brittle surface that breaks into irregular pieces. This cooling step is essential; cutting while warm will result in a mushy mess.
- Break the bark into bite‑sized pieces. Use your hands or a knife—there’s no right or wrong shape. The pieces should have a crisp edge and a caramel center, with apple bits peeking through.
- Enjoy immediately or store in an airtight container. The bark keeps well at room temperature for up to a week. For longer storage, refrigerate or freeze; just remember to let it warm to room temperature before breaking.
That’s it — you did it. But hold on, I’ve got a few more tricks that will take this to another level…
Insider Tricks for Flawless Results
The Temperature Rule Nobody Follows
Caramel is a fickle friend; the difference between a silky sauce and a burnt mess is a few degrees. Use a candy thermometer and aim for 320°F (160°C). This ensures the caramel thickens just enough to coat the apples without scorching. If you don’t have a thermometer, look for a deep amber color and a slight resistance when you stir.
Why Your Nose Knows Best
Smell the caramel as it cooks. A sweet, buttery aroma that’s not too sugary is a sign of success. If it starts to smell burnt or overly sweet, lower the heat immediately. Your nose is the fastest way to catch a mistake before it ruins the entire batch.
The 5‑Minute Rest That Changes Everything
After baking, let the bark rest on the sheet for exactly five minutes before moving it. This brief pause allows the caramel to set properly, making it easier to break into pieces. A shorter rest will result in a sticky, uneven bark.
The Salt Secret
A pinch of sea salt isn’t just for flavor; it also balances the sweetness and enhances the apple’s natural acidity. If you’re on a low‑sodium diet, use a salt substitute, but remember it won’t provide the same flavor lift. Adding salt after baking can also work, but the caramel will be slightly less glossy.
The Apple Swap
If you’re in the middle of a pumpkin patch, try pumpkin puree instead of apples. The puree will give the bark a subtle sweetness and a smooth texture. Just reduce the amount of sugar slightly, as pumpkin has its own natural sugars.
Creative Twists and Variations
This recipe is a playground. Here are some of my favorite ways to switch things up:
Nutty Crunch
Add a cup of toasted pecans or walnuts before baking. The nuts will add a buttery crunch and a nutty depth that pairs wonderfully with the caramel.
Spiced Up
Swap cinnamon for a blend of cardamom, ginger, and cloves. This spice mix creates a warm, exotic flavor profile that’s perfect for holiday gatherings.
Chocolate Drizzle
Once the bark has cooled, drizzle melted dark chocolate over it. The chocolate will set into a glossy sheen, giving the bark a decadent finish.
Coconut Twist
Sprinkle toasted coconut flakes over the bark before baking. The coconut adds a tropical crunch and a subtle sweet flavor that complements the caramel.
Minty Fresh
Add a handful of fresh mint leaves to the caramel mixture before baking. The mint infuses a refreshing note that balances the sweetness and adds a pop of color.
Berry Burst
Replace apples with diced strawberries or blueberries. The berries will give the bark a bright, juicy burst of flavor and a beautiful color contrast.
Storing and Bringing It Back to Life
Fridge Storage
Place the cooled bark in an airtight container at room temperature for up to a week. The caramel remains crisp, and the apple pieces stay fresh. If you notice any moisture, add a sheet of parchment paper between layers to absorb excess dampness.
Freezer Friendly
Wrap the bark tightly in plastic wrap, then place it in a freezer bag. It will stay crisp for up to two months. When you’re ready to enjoy, let it thaw at room temperature for 10 minutes before breaking.
Best Reheating Method
To revive the bark’s crispness, place it in a preheated oven at 350°F for 5 minutes. A splash of water before reheating can help steam the bark back to a slightly softer texture, making it perfect for a warm snack.